npm is a package manager that installs, publishes and manages node programs.
To install it in an ASP.NET Core 1.0 Visual Studio 2015 application, Right-Click on the wwwroot folder, Add a New Item, then click on Client Side in the left nav, and select npm Configuration File and click Add. It will add the default package.json file to the project.
Within the package.json file, change the name attribute to something specific to your application. In my case, I named it “myfirstaspnetcoreapp.” Must be lowercase, it seems to accept spaces but I have avoided them.
By default the attribute name is set to “asp.net”. If you don’t change the name, the Dependencies folder won’t get generated. The Dependencies folder is where the npm packages are referenced.
To add bootstrap to my project, I need to add a dependencies attribute group, and specify the package and version number. Here is my package.json file:
{
  "version": "1.0.0",
  "name": "myfirstaspnetcoreapp",
  "private": true,
  "devDependencies": {
  },
  "dependencies": {
    "bootstrap": "^3.3.7"
  }
}
Note the hat/carat character in the version number for bootstrap. That means give me the latest version 3 package greater than or equal to 3.3.7 but less than version 4.
The moment you save this file, bootstrap will be loaded and you will see the bootstrap package referenced under the Dependencies > npm folder.
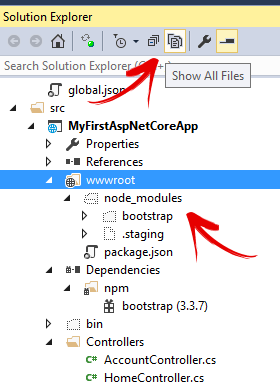
The files themselves will be installed at the root level of the wwwroot folder under a node_modules folder, but that folder will be hidden. You can find it by clicking on the Show All Files icon at the top of Solution Explorer.
Note that a lot of people install the package.json file at the top level of the project. The problem with that is that only files installed under wwwroot are able to be served to the web site. To get around that, those people have to either use gulp to relocate the package files as a post build step, or they use another UseStaticFiles statement in the Startup Configure method and supply the alternative folder in the options collection.
The method I am using seems a bit cleaner to me, so unless someone can tell me why I shouldn’t do this, I’m going with this method.
Now if you build and run the application, you should be able to go directly to the file and it will be served to you:
http://localhost:3858/node_modules/bootstrap/dist/css/bootstrap.css
Because of this, you will now be able to reference the stylesheet from within your header:
<html>
<head>
  <title>Home</title>
  		<link href="/node_modules/bootstrap/dist/css/bootstrap.css" rel="stylesheet" />
</head>
Bootstrap has been around for a long time, so I won’t go into how bootstrap works. By default bootstrap works off a division of horizontal screen space into 12 columns. Here I have put a little bit of styling on one of my pages. col-md-6 is a 6 column division for a medium screen size (to become responsive, you can specify in the same class tags a different number of columns for a different target screen size).
@using System.Security.Claims
@model MyFirstAspNetCoreApp.Entities.Hotel

<html>
<head>
  <title>Detail</title>
  	<link href="/node_modules/bootstrap/dist/css/bootstrap.css" rel="stylesheet" />
<style>
    .col-md-6 {
      border: 2px solid black;
    }
  </style>

</head>
<body>
<h1>Welcome!</h1>
@if (User.Identity.IsAuthenticated)
  {
<div class="row">
<div class="col-md-12">@User.Identity.Name</div>
</div>
<div class="row">
<div class="col-md-12">
<form method="post" asp-controller="Account" asp-action="Logout">
          <input type="submit" value="Logout" />
        </form></div>
</div>
}
  else
  {
<div class="row">
<div class="col-md-6">
        <a asp-controller="Account" asp-action="Login">Login</a></div>
<div class="col-md-6">
        <a asp-controller="Account" asp-action="Register">Register</a></div>
</div>
}
<div class="row">
<div class="col-md-6">@Model.Id</div>
<div class="col-md-6">@Model.DisplayName</div>
</div>
</body>
</html>

You must be logged in to post a comment.