A C#.Net AWS Lambda Authorizer to replace the one in Serverless Security Workshop

February 3, 2023

The Serverless Security Workshop is a good little exercise that teaches a number of security concepts to developers. It’s a little bit buggy, but if you can manage to get past that, it demonstrates how to secure a web api with Cognito using a ClientId and ClientSecret. Of course, the Authoriser Lambda is written in Javascript, as is the Api code. There isn’t that much out there that really shows how to do it in C# in .net 6, so I thought I would write a replacement for that.

The original workshop is here: https://catalog.us-east-1.prod.workshops.aws/workshops/026f84fd-f589-4a59-a4d1-81dc543fcd30/en-US

using Amazon.DynamoDBv2;
using Amazon.DynamoDBv2.DataModel;
using Amazon.Lambda.APIGatewayEvents;
using Amazon.Lambda.Core;
using Microsoft.IdentityModel.Tokens;
using Newtonsoft.Json;
using System.IdentityModel.Tokens.Jwt;
using System.Security.Cryptography;

// Assembly attribute to enable the Lambda function's JSON input to be converted into a .NET class.
[assembly: LambdaSerializer(typeof(Amazon.Lambda.Serialization.SystemTextJson.DefaultLambdaJsonSerializer))]

namespace AWSAuthorizationLambdaSample;

public class Function
{
    public class SecurityConstants
    {
        public const string Issuer = "https://cognito-idp.us-east-1.amazonaws.com/put-your-cognito-endpoint-here";
    }

    public class WildRydesScopes
    {
        public const string CustomizeUnicorns = "WildRydes/CustomizeUnicorn";
        public const string PartnerAdmin = "WildRydes/ManagePartners";
    }

    private static List? m_pems;

    public Function() { 
        //Like the original javascript, this caches the pems keys locally
        if (m_pems == null)
        {
            using HttpClient client = new();
            var jsonString = client.GetStringAsync("https://cognito-idp.put-your-region-here.amazonaws.com/put-your-cognito-endpoint-here/.well-known/jwks.json").Result;
            var jwksObject = JsonConvert.DeserializeObject(jsonString);
            if (jwksObject == null)
            {
                throw new UnauthorizedAccessException();
            }
            LambdaLogger.Log("\nJwksObject: " + JsonConvert.SerializeObject(jwksObject) + "\n");
            m_pems = jwksObject.keys;
        }
    }

    public async Task ValidateToken(APIGatewayCustomAuthorizerRequest apigAuthRequest, ILambdaContext context)
    {
        LambdaLogger.Log("\nValidateTokenV3");
        LambdaLogger.Log("\nEVENT: " + JsonConvert.SerializeObject(apigAuthRequest) + "\n");
        LambdaLogger.Log("\nCONTEXT: " + JsonConvert.SerializeObject(context) + "\n");

        var authToken = apigAuthRequest.AuthorizationToken;
        LambdaLogger.Log("\nauthToken:" + authToken + "\n");

        var handler = new JwtSecurityTokenHandler();

        var jsonToken = handler.ReadJwtToken(authToken);
        if (jsonToken == null)
        {
            throw new UnauthorizedAccessException();
        }
        LambdaLogger.Log("\nJsonToken: " + JsonConvert.SerializeObject(jsonToken) + "\n");

        var kid = (string)jsonToken.Header["kid"];
        LambdaLogger.Log("\nkid: " + kid + "\n");

        //Get the pems key that matches the key id in the token         
        var cognitoPublicKey = m_pems?.FirstOrDefault(k => k.kid == kid);
        if (cognitoPublicKey == null)
        {
            throw new UnauthorizedAccessException();
        }

        var tokenValidationParams = new TokenValidationParameters
        {
            ValidateIssuer = true,
            ValidIssuer = SecurityConstants.Issuer,
            ValidateAudience = false, //validating audience doesn't work for some unknown reason
            ValidAudience = SecurityConstants.Issuer,
            IssuerSigningKey = new RsaSecurityKey(new RSAParameters()
            {
                //RSA only requires the modulus and exponent from the public key to decrypt the token
                Modulus = Base64UrlEncoder.DecodeBytes(cognitoPublicKey.n),
                Exponent = Base64UrlEncoder.DecodeBytes(cognitoPublicKey.e)
            }),
            ClockSkew = TimeSpan.FromMinutes(5),
            ValidateIssuerSigningKey = true
        };

        LambdaLogger.Log("tokenValidationParams:\n" + JsonConvert.SerializeObject(tokenValidationParams));

        var isAuthorized = false;
        var hasPartnerScope = false;
        var hasCustomizeUnicornsScope = false;
        var clientId = string.Empty;

        if (!string.IsNullOrWhiteSpace(apigAuthRequest.AuthorizationToken))
        {
            try
            {
                var tokenValidationResult = await handler.ValidateTokenAsync(apigAuthRequest.AuthorizationToken, tokenValidationParams);
                if (!tokenValidationResult.IsValid)
                {
                    throw new UnauthorizedAccessException();
                }

                isAuthorized = tokenValidationResult.IsValid;

                var scope = (string?)tokenValidationResult?.Claims["scope"];
                if (scope != null)
                {
                    hasPartnerScope = scope.Contains(WildRydesScopes.PartnerAdmin);
                    hasCustomizeUnicornsScope = scope.Contains(WildRydesScopes.CustomizeUnicorns);
                }

                clientId = (string?)tokenValidationResult?.Claims["client_id"];
                if (clientId == null)
                {
                    throw new UnauthorizedAccessException();
                }
            }
            catch (Exception ex)
            {
                LambdaLogger.Log($"Error occurred validating token: {ex.Message}");
                throw new UnauthorizedAccessException();
            }
        }
        var policy = new APIGatewayCustomAuthorizerPolicy
        {
            Version = "2012-10-17",
            Statement = new List()
        };
        var contextOutput = new APIGatewayCustomAuthorizerContextOutput();

        // string MethodArn = "arn:aws:execute-api:us-east-1:123456789012:example/prod/POST/{proxy+}";

        if (isAuthorized)
        {
            var resourceRoot = GetResourceRoot(apigAuthRequest.MethodArn);

            var policyStatement = new APIGatewayCustomAuthorizerPolicy.IAMPolicyStatement
            {
                Action = new HashSet(new string[] { "execute-api:Invoke" }),
                Effect = "Allow",
                Resource = new HashSet()
            };

            // Start Policy Statements

            // 1. Any authenticated clients can list customisation options
            policyStatement.Resource.Add(resourceRoot + "/GET/horns");
            policyStatement.Resource.Add(resourceRoot + "/GET/socks");
            policyStatement.Resource.Add(resourceRoot + "/GET/glasses");
            policyStatement.Resource.Add(resourceRoot + "/GET/capes");

            // 2. When the scope matches the Partner Admin scope, then allow partner methods
            if (hasPartnerScope == true)
            {
                policyStatement.Resource.Add(resourceRoot + "/GET/partner*");
                policyStatement.Resource.Add(resourceRoot + "/POST/partner*");
                policyStatement.Resource.Add(resourceRoot + "/DELETE/partner*");
            }

            // 3. When the scope matches the unicorn customisations scope, retrieve the company id from the dynamo database
            //    otherwise it's not authorised
            if (hasCustomizeUnicornsScope == true)
            {
                policyStatement.Resource.Add(resourceRoot + "/GET/customizations*");
                policyStatement.Resource.Add(resourceRoot + "/POST/customizations*");
                policyStatement.Resource.Add(resourceRoot + "/DELETE/customizations*");

                // this is for the right to add customisations to the database.
                // a company can only add customisations to their own set of unicorns
                var companyId = await GetCompanyIdForClientAsync(clientId);
                contextOutput["CompanyID"] = companyId;
            }

            policy.Statement.Add(policyStatement);

            // End Policy Statements
        }
        else
        {
            throw new UnauthorizedAccessException();
        }
        return new APIGatewayCustomAuthorizerResponse
        {
            PolicyDocument = policy,
            Context = contextOutput
        };

    }

    public async Task GetCompanyIdForClientAsync(string clientId)
    {
        AmazonDynamoDBClient client = new AmazonDynamoDBClient();
        DynamoDBContext dbContext = new DynamoDBContext(client);
        var result = await dbContext.LoadAsync(clientId);
        if (result != null)
        {
            return result.CompanyID;
        }
        return null;
    }

    private string GetResourceRoot(string methodArn)
    {
        var tmp = methodArn.Split(':');
        var apiGatewayArnTmp = tmp[5].Split('/');
        return $"{tmp[0]}:{tmp[1]}:{tmp[2]}:{tmp[3]}:{tmp[4]}:{apiGatewayArnTmp[0]}/{apiGatewayArnTmp[1]}";
    }

}

The original JavaScript authorizer looks like this:

console.log('Loading function');

const jwt = require('jsonwebtoken');
const request = require('request');
const jwkToPem = require('jwk-to-pem');

const userPoolId = process.env["USER_POOL_ID"];
const region = process.env["AWS_REGION"]; //e.g. us-east-1
const iss = 'https://cognito-idp.' + region + '.amazonaws.com/' + userPoolId;

const AWS = require('aws-sdk');
const ddbDocClient = new AWS.DynamoDB.DocumentClient({
    region: process.env.AWS_REGION
});

const companyDDBTable = process.env["PARTNER_DDB_TABLE"];
const CUSTOMIZE_SCOPE = "WildRydes/CustomizeUnicorn";

const PARTNER_ADMIN_SCOPE = "WildRydes/ManagePartners";

var pems;


exports.handler = (event, context, callback) => {
    console.log("received event:\n" + JSON.stringify(event, null, 2));

    //Download PEM for your UserPool if not already downloaded
    if (!pems) {
        //Download the JWKs and save it as PEM
        request({
            url: iss + '/.well-known/jwks.json',
            json: true
        }, function (error, response, body) {
            if (!error && response.statusCode === 200) {
                pems = {};
                var keys = body['keys'];
                for (var i = 0; i < keys.length; i++) {
                    //Convert each key to PEM
                    var key_id = keys[i].kid;
                    var modulus = keys[i].n;
                    var exponent = keys[i].e;
                    var key_type = keys[i].kty;
                    var jwk = {kty: key_type, n: modulus, e: exponent};
                    var pem = jwkToPem(jwk);
                    pems[key_id] = pem;
                }
                //Now continue with validating the token
                ValidateToken(pems, event, context, callback);
            } else {
                //Unable to download JWKs, fail the call
                context.fail("error");
            }
        });
    } else {
        //PEMs are already downloaded, continue with validating the token
        ValidateToken(pems, event, context, callback);
    }
};

function ValidateToken(pems, event, context, callback) {

    var token = event.authorizationToken;

    // the auth header may come in the format of "Bearer " or ""
    var parts = token.split(' ');
    if (parts.length == 2) {
        var schema = parts.shift().toLowerCase();
        token = parts.join(' ');
        if ('bearer' != schema) {
            console.log("Schema " + schema + " not supported");
            context.fail("Unauthorized");
            return;
        }
    }

    //Fail if the token is not jwt
    var decodedJwt = jwt.decode(token, {complete: true});
    if (!decodedJwt) {
        console.log("Not a valid JWT token");
        context.fail("Unauthorized");
        return;
    }

    //Fail if token is not from your UserPool
    if (decodedJwt.payload.iss != iss) {
        console.log("invalid issuer");
        context.fail("Unauthorized");
        return;
    }

    //Reject the jwt if it's not an 'Access Token'
    if (decodedJwt.payload.token_use != 'access') {
        console.log("Not an access token");
        context.fail("Unauthorized");
        return;
    }

    //Get the kid from the token and retrieve corresponding PEM
    var kid = decodedJwt.header.kid;
    var pem = pems[kid];
    if (!pem) {
        console.log('Invalid access token');
        context.fail("Unauthorized");
        return;
    }

    //Verify the signature of the JWT token to ensure it's really coming from your User Pool

    jwt.verify(token, pem, {issuer: iss}, function (err, payload) {
        if (err) {
            console.log("error verifying token: " + JSON.stringify(err, null, 2));
            context.fail("Unauthorized");
        } else {
            console.log("Token payload: " + JSON.stringify(payload));
            //Valid token. Generate the API Gateway policy for the user
            //Always generate the policy on value of 'sub' claim and not for 'username' because username is reassignable
            //sub is UUID for a user which is never reassigned to another user.
            var principalId = payload.username;

            //Get AWS AccountId and API Options
            var apiOptions = {};
            var tmp = event.methodArn.split(':');
            var apiGatewayArnTmp = tmp[5].split('/');
            var awsAccountId = tmp[4];
            apiOptions.region = tmp[3];
            apiOptions.restApiId = apiGatewayArnTmp[0];
            apiOptions.stage = apiGatewayArnTmp[1];
            var method = apiGatewayArnTmp[2];
            var resource = '/'; // root resource
            if (apiGatewayArnTmp[3]) {
                resource += apiGatewayArnTmp[3];
            }
            //For more information on specifics of generating policy, refer to blueprint for API Gateway's Custom authorizer in Lambda console
            var policy = new AuthPolicy(principalId, awsAccountId, apiOptions);

            // Any authenticated clients can list customization options
            policy.allowMethod(AuthPolicy.HttpVerb.GET, "/horns");
            policy.allowMethod(AuthPolicy.HttpVerb.GET, "/socks");
            policy.allowMethod(AuthPolicy.HttpVerb.GET, "/glasses");
            policy.allowMethod(AuthPolicy.HttpVerb.GET, "/capes");

            // When the scope matches the partner admin scope
            if (payload.scope.includes(PARTNER_ADMIN_SCOPE)) {
                policy.allowMethod(AuthPolicy.HttpVerb.GET, "/partner*");
                policy.allowMethod(AuthPolicy.HttpVerb.POST, "/partner*");
                policy.allowMethod(AuthPolicy.HttpVerb.DELETE, "/partner*");

                const authResponse = policy.build();
                console.log("authResponse:" + JSON.stringify(authResponse, null, 2));
                callback(null, authResponse);
                return;
            }

            // When the scope matches the unicorn customizations scope, ensure the company can be found in the ID loopup table
            if (payload.scope.includes(CUSTOMIZE_SCOPE)) {
                policy.allowMethod(AuthPolicy.HttpVerb.GET, "/customizations*");
                policy.allowMethod(AuthPolicy.HttpVerb.POST, "/customizations*");
                policy.allowMethod(AuthPolicy.HttpVerb.DELETE, "/customizations*");
                const authResponse = policy.build();

                // look up the backend ID for the company
                var params = {
                    TableName: companyDDBTable,
                    Key: {'ClientID': payload["client_id"]}
                };

                ddbDocClient.get(params).promise().then(data => {
                    console.log("DDB response:\n" + JSON.stringify(data));
                    if (data["Item"] && "CompanyID" in data["Item"]) {
                        authResponse.context = {
                            CompanyID: data["Item"]["CompanyID"]
                        };

                        // Uncomment here to pass on the client ID as the api key in the auth response
                        // authResponse.usageIdentifierKey = payload["client_id"];

                        console.log("authResponse:" + JSON.stringify(authResponse, null, 2));
                        callback(null, authResponse);
                        return;
                    } else {
                        console.log("did not find matching clientID");
                        context.fail("Unauthorized");
                        return;
                    }

                }).catch(err => {
                    console.error((err));
                    callback("Error: Internal Error");
                    return;
                });
            } else {
                console.log("did not find matching clientID");
                context.fail("Unauthorized");
                return;
            }
        }
    });
}

/**
 * AuthPolicy receives a set of allowed and denied methods and generates a valid
 * AWS policy for the API Gateway authorizer. The constructor receives the calling
 * user principal, the AWS account ID of the API owner, and an apiOptions object.
 * The apiOptions can contain an API Gateway RestApi Id, a region for the RestApi, and a
 * stage that calls should be allowed/denied for. For example
 * {
 *   restApiId: "xxxxxxxxxx",
 *   region: "us-east-1",
 *   stage: "dev"
 * }
 *
 * var testPolicy = new AuthPolicy("[principal user identifier]", "[AWS account id]", apiOptions);
 * testPolicy.allowMethod(AuthPolicy.HttpVerb.GET, "/users/username");
 * testPolicy.denyMethod(AuthPolicy.HttpVerb.POST, "/pets");
 * context.succeed(testPolicy.build());
 *
 * @class AuthPolicy
 * @constructor
 */
function AuthPolicy(principal, awsAccountId, apiOptions) {
    /**
     * The AWS account id the policy will be generated for. This is used to create
     * the method ARNs.
     *
     * @property awsAccountId
     * @type {String}
     */
    this.awsAccountId = awsAccountId;

    /**
     * The principal used for the policy, this should be a unique identifier for
     * the end user.
     *
     * @property principalId
     * @type {String}
     */
    this.principalId = principal;

    /**
     * The policy version used for the evaluation. This should always be "2012-10-17"
     *
     * @property version
     * @type {String}
     * @default "2012-10-17"
     */
    this.version = "2012-10-17";

    /**
     * The regular expression used to validate resource paths for the policy
     *
     * @property pathRegex
     * @type {RegExp}
     * @default '^\/[/.a-zA-Z0-9-\*]+

     */
    this.pathRegex = new RegExp('^[/.a-zA-Z0-9-\*]+
);

    // these are the internal lists of allowed and denied methods. These are lists
    // of objects and each object has 2 properties: A resource ARN and a nullable
    // conditions statement.
    // the build method processes these lists and generates the approriate
    // statements for the final policy
    this.allowMethods = [];
    this.denyMethods = [];

    if (!apiOptions || !apiOptions.restApiId) {
        this.restApiId = "*";
    } else {
        this.restApiId = apiOptions.restApiId;
    }
    if (!apiOptions || !apiOptions.region) {
        this.region = "*";
    } else {
        this.region = apiOptions.region;
    }
    if (!apiOptions || !apiOptions.stage) {
        this.stage = "*";
    } else {
        this.stage = apiOptions.stage;
    }
};

/**
 * A set of existing HTTP verbs supported by API Gateway. This property is here
 * only to avoid spelling mistakes in the policy.
 *
 * @property HttpVerb
 * @type {Object}
 */
AuthPolicy.HttpVerb = {
    GET: "GET",
    POST: "POST",
    PUT: "PUT",
    PATCH: "PATCH",
    HEAD: "HEAD",
    DELETE: "DELETE",
    OPTIONS: "OPTIONS",
    ALL: "*"
};

AuthPolicy.prototype = (function () {
    /**
     * Adds a method to the internal lists of allowed or denied methods. Each object in
     * the internal list contains a resource ARN and a condition statement. The condition
     * statement can be null.
     *
     * @method addMethod
     * @param {String} The effect for the policy. This can only be "Allow" or "Deny".
     * @param {String} he HTTP verb for the method, this should ideally come from the
     *                 AuthPolicy.HttpVerb object to avoid spelling mistakes
     * @param {String} The resource path. For example "/pets"
     * @param {Object} The conditions object in the format specified by the AWS docs.
     * @return {void}
     */
    var addMethod = function (effect, verb, resource, conditions) {
        if (verb != "*" && !AuthPolicy.HttpVerb.hasOwnProperty(verb)) {
            throw new Error("Invalid HTTP verb " + verb + ". Allowed verbs in AuthPolicy.HttpVerb");
        }

        if (!this.pathRegex.test(resource)) {
            throw new Error("Invalid resource path: " + resource + ". Path should match " + this.pathRegex);
        }

        var cleanedResource = resource;
        if (resource.substring(0, 1) == "/") {
            cleanedResource = resource.substring(1, resource.length);
        }
        var resourceArn = "arn:aws:execute-api:" +
            this.region + ":" +
            this.awsAccountId + ":" +
            this.restApiId + "/" +
            this.stage + "/" +
            verb + "/" +
            cleanedResource;

        if (effect.toLowerCase() == "allow") {
            this.allowMethods.push({
                resourceArn: resourceArn,
                conditions: conditions
            });
        } else if (effect.toLowerCase() == "deny") {
            this.denyMethods.push({
                resourceArn: resourceArn,
                conditions: conditions
            })
        }
    };

    /**
     * Returns an empty statement object prepopulated with the correct action and the
     * desired effect.
     *
     * @method getEmptyStatement
     * @param {String} The effect of the statement, this can be "Allow" or "Deny"
     * @return {Object} An empty statement object with the Action, Effect, and Resource
     *                  properties prepopulated.
     */
    var getEmptyStatement = function (effect) {
        effect = effect.substring(0, 1).toUpperCase() + effect.substring(1, effect.length).toLowerCase();
        var statement = {};
        statement.Action = "execute-api:Invoke";
        statement.Effect = effect;
        statement.Resource = [];

        return statement;
    };

    /**
     * This function loops over an array of objects containing a resourceArn and
     * conditions statement and generates the array of statements for the policy.
     *
     * @method getStatementsForEffect
     * @param {String} The desired effect. This can be "Allow" or "Deny"
     * @param {Array} An array of method objects containing the ARN of the resource
     *                and the conditions for the policy
     * @return {Array} an array of formatted statements for the policy.
     */
    var getStatementsForEffect = function (effect, methods) {
        var statements = [];

        if (methods.length > 0) {
            var statement = getEmptyStatement(effect);

            for (var i = 0; i < methods.length; i++) {
                var curMethod = methods[i];
                if (curMethod.conditions === null || curMethod.conditions.length === 0) {
                    statement.Resource.push(curMethod.resourceArn);
                } else {
                    var conditionalStatement = getEmptyStatement(effect);
                    conditionalStatement.Resource.push(curMethod.resourceArn);
                    conditionalStatement.Condition = curMethod.conditions;
                    statements.push(conditionalStatement);
                }
            }

            if (statement.Resource !== null && statement.Resource.length > 0) {
                statements.push(statement);
            }
        }

        return statements;
    };

    return {
        constructor: AuthPolicy,

        /**
         * Adds an allow "*" statement to the policy.
         *
         * @method allowAllMethods
         */
        allowAllMethods: function () {
            addMethod.call(this, "allow", "*", "*", null);
        },

        /**
         * Adds a deny "*" statement to the policy.
         *
         * @method denyAllMethods
         */
        denyAllMethods: function () {
            addMethod.call(this, "deny", "*", "*", null);
        },

        /**
         * Adds an API Gateway method (Http verb + Resource path) to the list of allowed
         * methods for the policy
         *
         * @method allowMethod
         * @param {String} The HTTP verb for the method, this should ideally come from the
         *                 AuthPolicy.HttpVerb object to avoid spelling mistakes
         * @param {string} The resource path. For example "/pets"
         * @return {void}
         */
        allowMethod: function (verb, resource) {
            addMethod.call(this, "allow", verb, resource, null);
        },

        /**
         * Adds an API Gateway method (Http verb + Resource path) to the list of denied
         * methods for the policy
         *
         * @method denyMethod
         * @param {String} The HTTP verb for the method, this should ideally come from the
         *                 AuthPolicy.HttpVerb object to avoid spelling mistakes
         * @param {string} The resource path. For example "/pets"
         * @return {void}
         */
        denyMethod: function (verb, resource) {
            addMethod.call(this, "deny", verb, resource, null);
        },

        /**
         * Adds an API Gateway method (Http verb + Resource path) to the list of allowed
         * methods and includes a condition for the policy statement. More on AWS policy
         * conditions here: http://docs.aws.amazon.com/IAM/latest/UserGuide/reference_policies_elements.html#Condition
         *
         * @method allowMethodWithConditions
         * @param {String} The HTTP verb for the method, this should ideally come from the
         *                 AuthPolicy.HttpVerb object to avoid spelling mistakes
         * @param {string} The resource path. For example "/pets"
         * @param {Object} The conditions object in the format specified by the AWS docs
         * @return {void}
         */
        allowMethodWithConditions: function (verb, resource, conditions) {
            addMethod.call(this, "allow", verb, resource, conditions);
        },

        /**
         * Adds an API Gateway method (Http verb + Resource path) to the list of denied
         * methods and includes a condition for the policy statement. More on AWS policy
         * conditions here: http://docs.aws.amazon.com/IAM/latest/UserGuide/reference_policies_elements.html#Condition
         *
         * @method denyMethodWithConditions
         * @param {String} The HTTP verb for the method, this should ideally come from the
         *                 AuthPolicy.HttpVerb object to avoid spelling mistakes
         * @param {string} The resource path. For example "/pets"
         * @param {Object} The conditions object in the format specified by the AWS docs
         * @return {void}
         */
        denyMethodWithConditions: function (verb, resource, conditions) {
            addMethod.call(this, "deny", verb, resource, conditions);
        },

        /**
         * Generates the policy document based on the internal lists of allowed and denied
         * conditions. This will generate a policy with two main statements for the effect:
         * one statement for Allow and one statement for Deny.
         * Methods that includes conditions will have their own statement in the policy.
         *
         * @method build
         * @return {Object} The policy object that can be serialized to JSON.
         */
        build: function () {
            if ((!this.allowMethods || this.allowMethods.length === 0) &&
                (!this.denyMethods || this.denyMethods.length === 0)) {
                throw new Error("No statements defined for the policy");
            }

            var policy = {};
            policy.principalId = this.principalId;
            var doc = {};
            doc.Version = this.version;
            doc.Statement = [];

            doc.Statement = doc.Statement.concat(getStatementsForEffect.call(this, "Allow", this.allowMethods));
            doc.Statement = doc.Statement.concat(getStatementsForEffect.call(this, "Deny", this.denyMethods));

            policy.policyDocument = doc;

            return policy;
        }
    };

})();

Adding ASP.NET Security to Angular

November 26, 2017

Overview

The purpose of this blog post is to provide the instructions for adding ASP.NET security to the default Angular template application available in Visual Studio .NET 2017. It’s non-trivial and, I believe Microsoft would provide a much better experience for Enterprise developers if they supplied this as an option out-of-the-box.

The way I do this is to create two applications, one is the default angular application, and the second is a default mvc application with individual security, then I just copy all the important bits from the mvc app across to the angular app.

The instructions

1. Prerequisites

a) Visual Studio Professional 2017 (Version 15.3.3 or newer)\

b) Dot net core 2.0 framework, available from https://www.microsoft.com/net/download/core

2. File -> New Project, Select ASP.NET Core Web Application. Name it (I called mine AngularWithSecurity) and put it in the location that you want. Click OK.

3. In the New ASP.NET Core Web Application screen, select .NET Framework from the first dropdown at the top, and select ASP.NET Core 2.0 in the second drop down. (If ASP.NET Core 2.0 is missing, there should be a yellow bar at the top, which you can click on to install it.)

4. Select Angular as the template. It doesn’t provide security out of the box, so just click Ok to continue.

5. It creates the initial structure and runs npm install. npm is the node package manager. Whereas the nuget package manager will work seamlessly through a proxy, npm will not, and it’s configuration can be a little bit tricky especially through corporate firewalls. If npm can’t get through the firewall, you’ll need to got to path c:\Users\[your usename] and add a file called .npmrc that contains something like:

proxy=http://proxy.xxx:8080
strict-ssl=false
https-proxy=http://proxy.xxx:8080
registry=http://registry.npmjs.org

If npm is not installed on your system, go the web site nodejs.org and install the node 64 bit v6.11.3 LTS version. Npm (node package manager) comes with it.

6. Build the application and make sure it runs. Note that it could take some time in your environment to load all the packages the first time, perhaps even 5 to 10 minutes. When there’s no proxy involved, it can be almost instantaneous.

It should show a generic Angular app that provides a counter and shows how to fetch data via a web api call, but no database interaction. Now stop the application.

7. Create another application, File -> New Project and call it DefaultMVCApplication. We will generate an MVC application with security so that we can easily copy the bits we need to the angular application. Click OK to create the application.

8. Select .NET Framework and ASP.NET Core 2.0 in the dropdowns and then choose the Web Application (Model-View-Controller) template. Click the Change Authentication button and choose Individual User Accounts. Make sure “Store user accounts in-app” is selected. Then click OK to close that dialog box. Then click OK to create the MVC application.

9. Build that application to make sure everything is installed properly.

10. In the AngularWithSecurity application, right click on the project and click on Manage Nuget Packages. Add the following packages to the application:

EntityFramework (Latest stable 6.1.3)

AspNetCore.Authentication.Cookies (2.0)

AspNetCore.Identity.EntityFrameworkCore (2.0)

EntityFrameworkCore.SqlServer (2.0)

EntityFrameworkCore.Tools (2.0)

11. Add a new folder at the top level (the same level as ClientApp) called Models. Copy the entire Models folder from the DefaultMVCApplication into the Models folder of the AngularWithSecurity application.

12. Do the same with the Data folder:

Add a new folder at the top level (the same level as ClientApp) called Data. Copy the entire Data folder from the DefaultMVCApplication into the Data folder of the AngularWithSecurity application.

13. Do a global replace to replace the word DefaultMVCApplication with the word AngularWithSecurity.(EditàFind and ReplaceàReplace in all files, Find “DefaultMVCApplication” Replace with “AngularWithSecurity”, Entire Solution, then click Replace All. Click Yes, you are ok with changing it blindly. ) Check one of the files just imported to make sure the change happened.

14. In our environment, we have a slight change to the LoginViewModel to support usernames instead of email addresses for logging in. Go to the Models/AccountViewModels/LoginViewModel.cs file and add a UserName property. Make sure you add a Required attribute to the UserName and remove the Required attribute from the EmailAddress. Mine looks like this:

using System;
using System.Collections.Generic;
using System.ComponentModel.DataAnnotations;
using System.Linq;
using System.Threading.Tasks;
namespace AngularWithSecurity.Models.AccountViewModels
{
  public class LoginViewModel
  {
    [Required]
    public string UserName { get; set; }

    [EmailAddress]
    public string Email { get; set; }

    [Required]
    [DataType(DataType.Password)]
    public string Password { get; set; }

    [Display(Name = "Remember me?")]
    public bool RememberMe { get; set; }
  }
}

15. Do the same with the RegisterViewModel class. Mine looks like this:

public class RegisterViewModel
{
  [Required]
  public string UserName { get; set; }

  [EmailAddress]
  [Display(Name = "Email")]
  public string Email { get; set; }
[Required]
  [StringLength(100, ErrorMessage = "The {0} must be at least {2} and at max {1} characters long.", MinimumLength = 6)]
  [DataType(DataType.Password)]
  [Display(Name = "Password")]
  public string Password { get; set; }
[DataType(DataType.Password)]
  [Display(Name = "Confirm password")]
  [Compare("Password", ErrorMessage = "The password and confirmation password do not match.")]
  public string ConfirmPassword { get; set; }
}

16. Go to the Controllers folder and add a controller called AccountController. My AccountController contains the following code. You should be able to add just the properties and methods into the main class. This is a stripped down version of the AccountController class found in the DefaultMVCApplication project.

using System;
using System.Collections.Generic;
using System.Linq;
using System.Threading.Tasks;
using Microsoft.AspNetCore.Mvc;
using Microsoft.AspNetCore.Authorization;
using Microsoft.AspNetCore.Identity;
using YourNamespace.Models;
using Microsoft.AspNetCore.Authentication;
using AngularWithSecurity.Models.AccountViewModels;

// For more information on enabling MVC for empty projects, visit https://go.microsoft.com/fwlink/?LinkID=397860

namespace AngularWithSecurity.Controllers
{
  [Authorize]
  public class AccountController : Controller
  {
    private readonly UserManager _userManager;
    private readonly SignInManager _signInManager;

    public AccountController(
      UserManager userManager,
      SignInManager signInManager)
    {
      _userManager = userManager;
      _signInManager = signInManager;
    }

    //
    // GET: /Account/Login
    [HttpGet]
    [AllowAnonymous]
    public async Task Login(string returnUrl = null)
    {
      // Clear the existing external cookie to ensure a clean login process
      await HttpContext.SignOutAsync(IdentityConstants.ExternalScheme);
      ViewData["ReturnUrl"] = returnUrl;
      return View();
    }

    //
    // POST: /Account/Login
    [HttpPost]
    [AllowAnonymous]
    [ValidateAntiForgeryToken]
    public async Task Login(LoginViewModel model, string returnUrl = null)
    {
      ViewData["ReturnUrl"] = returnUrl;
      if (ModelState.IsValid)
      {
        var result = await _signInManager.PasswordSignInAsync(model.UserName, model.Password, model.RememberMe, lockoutOnFailure: false);
        if (result.Succeeded)
        {
          return RedirectToLocal(returnUrl);
        }
        ModelState.AddModelError(string.Empty, "Invalid login attempt.");
        return View(model);
     }

     // If we got this far, something failed, redisplay form
     return View(model);
   }

   //
   // GET: /Account/Register
   [HttpGet]
   [AllowAnonymous]
   public IActionResult Register(string returnUrl = null)
   {
     ViewData["ReturnUrl"] = returnUrl;
     return View();
   }

   //
   // POST: /Account/Register
   [HttpPost]
   [AllowAnonymous]
   [ValidateAntiForgeryToken]
   public async Task Register(RegisterViewModel model, string returnUrl = null)
   {
     ViewData["ReturnUrl"] = returnUrl;
     if (ModelState.IsValid)
     {
       var user = new ApplicationUser { UserName = model.UserName, Email = model.Email };
       var result = await _userManager.CreateAsync(user, model.Password);
       if (result.Succeeded)
       {
         // For more information on how to enable account confirmation and password reset please visit https://go.microsoft.com/fwlink/?LinkID=532713
         // Send an email with this link
         // var code = await _userManager.GenerateEmailConfirmationTokenAsync(user);
         // var callbackUrl = Url.Action(nameof(ConfirmEmail), "Account", new { userId = user.Id, code = code }, protocol: HttpContext.Request.Scheme);
         // await _emailSender.SendEmailAsync(model.Email, "Confirm your account",
         //    $"Please confirm your account by clicking this link: <a href='{callbackUrl}'>link</a>");

         await _signInManager.SignInAsync(user, isPersistent: false);
         return RedirectToLocal(returnUrl);
       }
       AddErrors(result);
    }
    // If we got this far, something failed, redisplay form
    return View(model);
  }  

  //
  // POST: /Account/Logout
  [HttpPost]
  [ValidateAntiForgeryToken]
  public async Task Logout()
  {
    await _signInManager.SignOutAsync();
    return RedirectToAction(nameof(HomeController.Index), "Home");
  }

  #region Helpers
  private void AddErrors(IdentityResult result)
  {
    foreach (var error in result.Errors)
    {
      ModelState.AddModelError(string.Empty, error.Description);
    }
  }

  private IActionResult RedirectToLocal(string returnUrl)
  {
    if (Url.IsLocalUrl(returnUrl))
    {
      return Redirect(returnUrl);
    }
    else
    {
      return RedirectToAction(nameof(HomeController.Index), "Home");
    }
  }

  #endregion

  }

}

17. If any of the fields in the AccountController class have red squiggly lines under them, it means that they need to have references added. Go over each one, click on Ctrl-. (Ctrl dot) and then select the first item on the tooltip helper for each one (I usually just click Enter when the tooltip appears).

18. At this stage, everything is compiling on my machine. Build the application to make sure everything compiles so far for you. If not, you need to go back and work through the steps to see what you’ve missed.

19. Go to the HomeController class in Controllers folder and add an Authorize attribute to the controller. This will make it require authorisation when attempting to access the main page. Mine looks like this:

using System;
using System.Collections.Generic;
using System.Diagnostics;
using System.Linq;
using System.Threading.Tasks;
using Microsoft.AspNetCore.Mvc;
using Microsoft.AspNetCore.Authorization;
namespace AngularWithSecurity.Controllers
{
  public class HomeController : Controller
  {

    [Authorize]
    public IActionResult Index()
    {
      return View();
    }

    public IActionResult Error()
    {
      ViewData["RequestId"] = Activity.Current?.Id ?? HttpContext.TraceIdentifier;
      return View();
    }
  }
}

20. Add a default database connection string into the appsettings.json file found in the root folder. Make sure you update the user id and password with valid values for you. This will give you a different sql profiler id which will help with debugging. The ASP.NET security database is found in the pool_master database. Mine looks like this:

{
  "ConnectionStrings": {
    "DefaultConnection": "Server=111.222.333.444\\YourSqlInstance,54321;Database=yourdatabasename;User Id=yourusername;Password=xxxxx;MultipleActiveResultSets=true"
  },
  "Logging": {
    "IncludeScopes": false,
    "Debug": {
      "LogLevel": {
        "Default": "Warning"
      }
    },
    "Console": {
      "LogLevel": {
        "Default": "Warning"
      }
    }
  }
}

21. Create a new folder at the root level (same level as ClientApp) and call it Filters. Add a class called AngularAntiForgeryCookieResultFilter. Mine looks like this:

using Microsoft.AspNetCore.Antiforgery;
using Microsoft.AspNetCore.Http;
using Microsoft.AspNetCore.Mvc;
using Microsoft.AspNetCore.Mvc.Filters;
using System;
using System.Collections.Generic;
using System.Linq;
using System.Threading.Tasks;
namespace AngularWithSecurity.Filters
{
  public class AngularAntiforgeryCookieResultFilter : ResultFilterAttribute
  {
    private IAntiforgery antiforgery;
    public AngularAntiforgeryCookieResultFilter(IAntiforgery antiforgery)
    {
       this.antiforgery = antiforgery;
    }

    public override void OnResultExecuting(ResultExecutingContext context)
    {
      if (context.Result is ViewResult)
      {
        var tokens = antiforgery.GetAndStoreTokens(context.HttpContext);
        context.HttpContext.Response.Cookies.Append("XSRF-TOKEN", tokens.RequestToken, new CookieOptions() { HttpOnly = false });
      }
    }
  }
}

22. Go to the Startup.cs file and make modifications to the ConfigureServices method, as follows. Make sure you get rid of any red squiggly lines by using the Ctrl-. trick.

public void ConfigureServices(IServiceCollection services)
{
  services.AddDbContext(options =>
    options.UseSqlServer(Configuration.GetConnectionString("DefaultConnection")));
  services.AddIdentity()
          .AddEntityFrameworkStores()
          .AddDefaultTokenProviders();

  //services.AddOptions();
  // services.Configure(Configuration);
  // Add framework services.
  services.AddAntiforgery(opts => opts.HeaderName = "X-XSRF-Token");
  services.AddMvc(opts =>
  {
    opts.Filters.AddService(typeof(AngularAntiforgeryCookieResultFilter));
  })
  .AddJsonOptions(options=> {
    options.SerializerSettings.DateTimeZoneHandling = DateTimeZoneHandling.Local;
  });
  services.AddTransient();
}

(You might need to adjust the time zone handling above to suit your own circumstances)

23. Still an Startup.cs, in another method, this time called Configure, add a line to tell ASP.NET Core to use the Authentication framework.

24. Find the Views folder at the root level and open the _ViewImports.cshtml file. Make sure it has code like this, replacing the Application name with your own:

@using AngularWithSecurity
@using AngularWithSecurity.Models
@using AngularWithSecurity.Models.AccountViewModels
@using Microsoft.AspNetCore.Identity
@addTagHelper *, Microsoft.AspNetCore.Mvc.TagHelpers
@addTagHelper *, Microsoft.AspNetCore.SpaServices

25. Still in the Views folder at the root level, add a new folder called Account. Inside this folder, add a new item, select the “MVC View Page” template, and call it Login.cshtml, then click Add. Then cut and paste the following code (remembering to replace the application name.)


@using System.Collections.Generic
@using System.Linq
@using Microsoft.AspNetCore.Http
@using Microsoft.AspNetCore.Http.Authentication
@model AngularWithSecurity.Models.AccountViewModels.LoginViewModel

.banner {
background: #32408f;
height: 64px;
width: 100%;
padding-left: 15px;
padding-top: 20px;
}

.banner h1 {
height: 30px;
display: table-cell;
vertical-align: middle;
color: #eee;
margin: 0;
float: left;
font-size: 24px;
}

.banner img {
margin-top: -6px;
float: left;
height: 36px;
}

.search-overlay {
background: rgba(68,138,255, 0.50);
border: 1px solid rgba(63,81,181, 0.9);
margin-top: 60px;
/*height: 233px;*/
height: 240px;
font-weight: bold;
width: 400px;
padding: 40px;
font-family: "Roboto";
margin-left: auto;
margin-right: auto;
display: block;
}

.search-overlay .row {
margin-top: 3px;
}

.search-overlay label {
margin-top: 2px !important;
font-size: 18px;
font-weight: normal;
color: #fff;
}

.search-overlay input {
color: #fff;
font-size: 18px;
font-weight: normal;
}

.search-overlay button {
color: #fff !important;
background-color: #448aff;
border: 1px solid #3077eb;
}

.main-login-div {
background-image: url(/images/main-banner.jpg);
background-color: #d9dfe3;
background-repeat: no-repeat;
background-attachment: fixed;
background-position: top left;
height: 100%;
min-height: 1000px;
min-width: 600px;
padding: 0;
margin: 0;
}

.nopadding {
padding: 0;
}

.validation-summary-errors {
background: #fff;
width: 318px;
color: red;
margin-top: 40px;
text-align: center;
}

.validation-summary-errors ul {
list-style: none;
padding: 10px;
}

<div class="container-fluid nopadding" style="overflow-x:hidden;">
<div class="row">
<div class="col-md-12">
<div class="row">
<div class="col-xs-12">
<div class="banner">
<div class="pull-left">
<img src="image/png;base64,iVBORw0KGgoAAAANSUhEUgAAAEsAAABACAYAAABSiYopAAAAAXNSR0IArs4c6QAAAARnQU1BAACxjwv8YQUAAAAJcEhZcwAADsMAAA7DAcdvqGQAAAAZdEVYdFNvZnR3YXJlAFBhaW50Lk5FVCB2My41LjVJivzgAAAOkElEQVR4Xu2baWxc13mGpaSOkxpB3WxN2wRoiyBVkj+xVkuUxH0dcRUpkxJ3kcPh7PvcWe7s5HC4SNxE2bLjBEE2W7KQxEWTHy5QIAhcoEB+FAX8o0DRFE6bNDGSpq6FKK5P3/fcc6kRRcoyEkljeT7gxd1m7j33ue/5znfukLsqUYlKVKISlahEJe5h5IqFh/ILxVNqsxK3i+zC3CMeXfvVSNQrpueSbwQX8uuxleLR3NOrH1EfqURpAFCyV3OKlsiU6IhMiyfiHjGeifzLeDLk0xZnutXHKsHQL557aDKrvdwSsYlmwGoJ20VbxCFaI3bRCYhnUqFXXYXMD/TFYsg7n/tw8sL596uvvjcjujrfAkf9tllziBa6DEtj3SEsgHciOA3XOUR/wi9GU5HvBYr5S9pi4eDMhdVH1CneW2Gf0Z9sg5taNLt0WGuU0JxwmFM0AVp9zC4aNTgPxzrCAIc8N5QI/rM1F1/RVovDhWc3HlWnevAjdH7uT4cykTfaQgBCYMplzUqt7JrKcY043hR1iIYoP2cXHdg3kPS/PjWj/623mJvyzWX/TJ32wQ3/4sxin+YSzWHkL+WqZm6rdVOlEJvkEmDZXUMO0RlyioF44K1TevCqcy69GF0p1qjTP1iRWl/6w8lM9BXCYteTYCIurFMGGLNrtoWdyGfGspXHAKsZ7jMBNmDdEp4WfTHX/w0l/K/4CunvxM/NPawudf9jaWX5M7FcejlUyCT6NM+eiWRkT3Bxdk/m6fU9+S8/uVt97LYRWVvs7Yl732JyN5zkksBK3VTqKlPNUcOBLRIwAbpEI7ppo2YD0CnRE7AJbaV4Tl2mPMKfT75s8VlFo39SnEADe9Do3phXYN/f9Uc8LwHgS8588qWJlOaEuv3z+e7k+vnu2ac39qhT7LLN6N/sCNoBivnJgGFC2BT3vY3otCYpDBxw60gm9Kv8U6t/ri5z/yO7cf5j08X0jxr8E+Jo8Kw4HBgXx/xnRQ1UDdX6zoo6qAEwm6DWwBRyjRzh/rs37Hy1X/e/ejqv/U+rTPIQHMMblq5R7jG3TW0HqlTGYIG6DdfxzKXmVVPLI3KX1j9un0292BywvnnUT1jj4jhAHQ0oAeKxIGASJLZ5nCJM+Vl17DiO1QB6jW9CVAcmRG3IKmqCk1hOISdNi+aYAW47QFvVBFgWOGxA8/wsvn7ugGpq+cRYPBQ6gS5JCIRVA0dJYZ37NgUoBEMRHoFKiGpfqcz9hGZJuDfrsbdTI90FsB0hu7DPpf8+c2m9vGYCzpy+ezgZ8jcFrNfljfrGbgJTevNcr/FNimq6CAC3HivdplsJqyPphXwAhu65jcPMLsqBwhwIWgCrN+YTybWlOtXM8orRdMTT6re+tdPNb+5HDqsmMHQ9E9jxwJhUNbuq7LZG161DV+3UPaILsNp13y2gqFJYXKe7CKwt6BD2bOzl4qX1j6kmlleMpyL+VsDgzRIEuyOXEhLErnkceemGzG7KzxuSoILGsg7HuwCrG7C6kn7RoXtlN2PJYc4tpZMULC43BwosezW38C3mO1Tzyi88M8mnWoJT16t96EbKOcxPJhjDSdvLBEuxK9cHJkU3AJ2Eq04C1skUgCU8qK/U/FIut0/+BNaEeeawHvqhv5D9gGpe+cV4WnOwDuPoZoKiOEKWwtmqbWHBVRIWQFHskp0AaALbCRZFmD0odj3FXEQ1rTxjMhd3WULTb/KmTQCl4LbTdrB6CIsCKK73YNmtHNZ2G1CGDKBn0uHXA+cK5esuhi2XmG4P2a+bNZbZLXdSKSyWIfUYDaWzVBc0tQks7pa5abtRkmIea4zxmF1M5fWcalb5hjWXsHFKZNZf20EydaewNqHh2Im45xZImwLERtRoLGxPR73Xoktzh1SzyjPchczu6XxyyhKw/eaddMM7goVc1oljFgDbzl3SWdjPtxudYZQSOf1v9I3l8n9lbZtJTHYGbNcJgt3RdJlM+mp7Z1hGzroFFvYz2cs6LOYCHGNiLl8gRo3uaU60OTHvjvvEQC76/cG0dtVVyMzjQdbrq0ufVE0sr3Bk45OcUNd6OY805oUSDERQO8GSSX4HWOZxlhgE1gJgLBkaoxCg1YZsOP+kqMI1D7tGxWHnCM5rEz0Jr+jXA2JQD/7Emom94iqknw2eKzjSGyvl8yIRjRrtDjuvyaSvIHFpdtF3AssUj1N0WFvcJWpCk+IIpl0HXSPigHNY7HdB7hG55PYxnNeSBtyUAVuWJoDXC50BwImMJsaz2ov+uczqVDa+R1td2JO+uPIH6hbubXgW86NdEeebBCLh0GVYv8VZW0qHnSSdBXVC7SmvhHXANWhAgvYB1F7PiNjnHcX6sDjkGRXtmKDLcytQdJoUtuV8FE7ti8F9SbgvExbWbNyumn/vw13MjnVpzt8e83PiPS5qUfGXwrqpKN0hwVMsI0qd1QW3WJIe6dL9jiEJay8FWNRjgHUA8CwYITdnB1APcx9kLuV1Ae8EplvMsRO5+H+qpt+fcC9khns0x7VaPPFqQtsRFrQFkinCMtd7AVW6DOvtuElO2g+gK+51DUl3SYcpt/F1NLsh4UrIUCfW6ay+hB/yid64V9Siyx50Dop+zfNr1ez7F/6l3JkOjFxHMXm+KWeZsPjkbwOLYCjpPuUS6RR85wSWBMbcJXMWBVAHnEOiDhAISJ7f/I4UXIUl3dUUmoITB6VavZP3F1Z8qfhRbWUhbF3IyIbx1XQV8leVmkMywZ/kE9ZvBnTHwk1zWsScuA/uYhd8jC4DsCo/X/8AEs7PXEUHSxcD0qmoV4xmo9dOz0Z/csgDuJ4hcdw5/JvsV5/aq5p+byK2svCoM6fXO7P65bN65D9Ox3FTaCynLg3hKQnJnHDz6fNp3y5n3Vb4Ht3DvMPSYT9GQsIitINM8jh3N5M6PiNdRuGzZ/TgG/5irt+5kNs9NaM/0+a3AtaIcK/NjajbuLuhrc33OvLxr46lIv82AED8NUg+UVoejWRxSTVEWBfdgMVjpXnpnYjfNSFwWlTlATC4SiZ5dM2WmBvOw3V5fV4H138CecpezPSqZu8qXNp42DabtDwR8bw+GPHeHVjx8/Of9BVzFmsu/tRoNgIwHvkij7UMb4TJtD2jkioayrwkh20FjAm+LmiVw7jsHltA9KYDt+zbqq60WpfdDUkfIA7DYUzyB6AGFLDtuF4H2kWH9aPC989nvzu7sfY+dRubUbiwui8xO7P5U97vHPry4iP+2Wz35Kz+wlAq/CorZHYxJkt2Mzk00018koDUoUYiM8HKJIttjmSNYZtM8ITVSWC46VKZbx62AiqV6che5j3A6kHN1IqHdgTAWJxWo3u189y4bp/mFtPZxAvh5cLd+6sdXz79YX8xf8o9l/2nkWTop6cTAWln2bUUDCNx8ukadQyBUNxvrsvcRFiQhIub4KsVc+63kza/r3QTMGyznOjFOTlI9ODhdREYut8Rz5ioco8Z3Q9d1JZPvJbdWP2Cuq3ff4Rnsnvsydi1AQ0AYHHeGF3Rh4bxafLGCUTCoritYJU6iTctwantbpWY26JOUYehvwHdkTL+TMl4P8WlJe6Uox3VSeHcEq6SOZKa55SCw7qwrxkVfDVyWBfAjWa0nweX5+7+SBeen3WMJsM/ZhHXpbrcDRcpCFApnO1FiMZ3uc2bbkHXPeTG5NeHEZIFK+eTnBqh4jd/EapBbjM0IepCVql6jKocWVvD08bbVAJGxW7R3XKacwLLlpRLtKMw7Q85/suRiT2ubufuR2rt/Gfcs+mvnZFdkCOL8YS5bkIiNDOZb6+bYTEftQI4EzFHsMPesc0fZs3RkrAMeKX7bojHOFCYf07AaUs15o081uI9K07HPD8PzGeH1W3c24icLw6jLvkF7d+FbmGCICiZY94BLH6ezmIiZhFJYIcwLaqCg24Auw0o6AjqNRa4hEZQEhiSe7vm+LU1FbmYfXL5c6rp9yeSF5Y/7ZhJFYbgMnZFjjYnMLElAJnHNuFs1VZYfvmb4H5MTQjL1OOYcFfxt0UFZDtQpujEI5hGVYWMNxqtPqs4m4n+KLq+ZFHNLY/Q187VTGRj/8BcJmf3AMf1WyGZutVZrIPorL2cAMNVfGsgHYbqW+YwwLidavEZdkH+adTpVOinobUFm2pe+cSVK1f/isuZSxc+4ZpNhYf10I9l17wJzlbdCqsuZJM5i7AeAyD5Tko5jMC2A1SqBuSlvoj7Z9OzyUz+Sxc/JRtXbgFYNxV2/sXZv57Ixa706/636DJTsmpXYKhuwDLzWwcSPF8JH4Sz9mNqIl+xmMCUwx7HSHkUzjnGH3OZm4LIZ8hPfDdmCdmuDyaD87EL5/arZry7IlzMjaGmee0UphVmJd8FQAaoG+J2u4IlXwtLUAYw81UL53Y8xgnxYcA6wmSPEbPVO3l9QPN827uYPawu++6M556/8sGVZ5+pn0xpSwOJwJt0lxwhsWTyP4nCVr50k3nOgMV53BcB6jGvAYnvpuT7Ke53DeHYEPYPiVp0uVNRz7+65zJWdbl3dwDWbughrnsW8s0j6cg/0mWcjkhwkFmbcWpSG5y6kaPoJDrMDUiA80WPsaxCV+yMOF8bz8Wi+sXlv5AXehAjs3H+E/aZRHIQLupGZc0yg8Ws7IrYd8w3YfxCAwfRPXu9hDQo9jnPiBrnKP/w95XA0uzchW99/fPqlA9+eBYyh60z8X8/xa5IlwFWB+osvrDjaLgPoPaxuznOiHp0t66Q48WBsOdQbmP10W9cufLH6jTvnfja1Rf+Mr688KWxROiXfchd7QD2OBK2LEThribvxP+ejvsvZzdW6795+Urr89+6/EfQR6Dy+TPuex2RxcLnbNnYt/swWlYjR/E/KLrC9hhynHwrcPW5Fz4EfVR+uBIoZp9c/ZBrRu8aT4U8S195piXzzNod/efGezaeu/z8w9BnuX71G8//idxZibePCqxKVKISdxS7dv0/zsSHqXtUX9gAAAAASUVORK5CYII=">
<h1>Site title</h1>
</div>
</div>
</div>
</div>
</div>
<div class="row">
<div class="col-xs-12" style="height:44px;background-color:#448aff;"></div>
</div>
</div>
<div class="row main-login-div">
<div class="col-xs-12">

<div class="search-overlay">
<div>
<div class="row">
<div class="col-xs-12">
Login:

<span class="text-danger"></span></div>
</div>
<div class="row">
<div class="col-xs-12">
Password:

<span class="text-danger"></span></div>
</div>
<div class="row">
<div class="col-xs-offset-4 col-xs-8" style="margin-top:8px;">

</div>
</div>
<div class="row">
<div class="col-xs-4"><a href="/Account/Register" style="color:#fff;text-decoration:underline;font-weight:normal;">Register</a></div>
<div class="col-xs-8">Login <i class="fa fa-key"></i></div>
</div>
<div class="row">
<div class="col-xs-12">
<div></div>
</div>
</div>
</div>
</div>
</div>
</div>
</div>
@section Scripts {
}

26. Add another .cshtml file, this time called Register.cshtml. Mine looks like this:


@model RegisterViewModel
@{
ViewData["Title"] = "Register";
}
<h2>@ViewData["Title"].</h2>

<h4>Create a new account.</h4>

<hr />

<div class="text-danger"></div>
<div class="form-group">

<div class="col-md-10">

<span class="text-danger"></span></div>
</div>
<div class="form-group">

<div class="col-md-10">

<span class="text-danger"></span></div>
</div>
<div class="form-group">

<div class="col-md-10">

<span class="text-danger"></span></div>
</div>
<div class="form-group">
<div class="col-md-offset-2 col-md-10">
Register</div>
</div>


@section Scripts {
}

27. Next, I will add a bit of angular code so that we can see who the logged in user is. Go into the SampleDataController class, found in the Controllers folder. Add the following method, which returns the currently logged in user name:


[HttpGet("[action]")]
public string WhoAmI()
{
  return this.User.Identity.Name;
}

28. Go to the fetchdata.component.ts file, found in the ClientApp/app/components/fetchdata folder. Add the following code, which I have highlighted, to the constructor method of the FetchDataComponent:


import { Component, Inject } from '@angular/core';
import { Http } from '@angular/http';

@Component({
selector: 'fetchdata',
templateUrl: './fetchdata.component.html'
})
export class FetchDataComponent {
public forecasts: WeatherForecast[];
public whoami: string = 'no-one';

constructor(http: Http, @Inject('BASE_URL') baseUrl: string) {
http.get(baseUrl + 'api/SampleData/WeatherForecasts').subscribe(result => {
this.forecasts = result.json() as WeatherForecast[];
}, error => console.error(error));

http.get(baseUrl + 'api/SampleData/WhoAmI').subscribe(result => {
this.whoami = result.text();
}, error => console.error(error));
}
}

interface WeatherForecast {
dateFormatted: string;
temperatureC: number;
temperatureF: number;
summary: string;
}

29. Go to the fetchdata.component.html file. Add the following highlighted code to the fetchdata.component.html page:

<h1>Weather forecast</h1>
This component demonstrates fetching data from the server.
<p><em>Loading...</em></p>

Congratulations, you are: {{whoami}}
<table class='table'>
<thead>
<tr>
<th>Date</th>
<th>Temp. (C)</th>
<th>Temp. (F)</th>
<th>Summary</th>
</tr>
</thead>
<tbody>
<tr>
<td>{{ forecast.dateFormatted }}</td>
<td>{{ forecast.temperatureC }}</td>
<td>{{ forecast.temperatureF }}</td>
<td>{{ forecast.summary }}</td>
</tr>
</tbody>
</table>

30. Right click on the project file and click on Properties. Go to the Debug tab and scroll down to Web Server Settings. Tick the Enable SSL box, then click on Copy to copy the SSL url to the clipboard. Select the App URL and right-click, paste, to paste the https url into the debug box. The application should now compile.

31. Run the application. It should automatically redirect you to the login page. Log in using a valid name and password. The home page should appear. Click on Fetch data. It should fetch data from the Web Api, and also return who the logged in user is. My page looks like this:

weather-forecast

And that’s it, you’ve added ASP.NET security to the default Angular application in Visual Studio!


Which JavaScript framework should I choose in the Enterprise?

July 16, 2017

There are various reasons that modern application developers should be using JavaScript frameworks when developing new applications. The modern browser has become almost a complete application hosting environment runtime. The added responsiveness, the performance, the ability to easily asynchronously request and manipulate data, to build different parts of your page progressively and independently, are only some of the benefits. If you’re going to choose to build an application in the browser, you need structure, you need to deliver features quickly, you need them to perform and you need to provide consistency.

JavaScript alone does not provide this. JavaScript doesn’t provide structure, it doesn’t provide custom UI elements, it doesn’t provide data binding or animations and it doesn’t provide a network communication framework. Everything in JavaScript is done with add-ons, and the time taken to build your own libraries can be prohibitive and a hindrance to actually delivering your own custom application logic.

Even Gartner says that you should be using a JavaScript framework. Gartner’s Research Director Bradley Daley says that 40% of companies are now using JavaScript frameworks heavily in their projects.

But we need to be careful here. It’s very easy to be swept up in hype. It seems to be a systemic problem in the industry that we have a tendency to jump into new technological choices far too quickly. Don’t be swayed or swept up by the hype.

But there are so many JavaScript frameworks! So which framework should you choose, and what are the criteria you should be looking at?

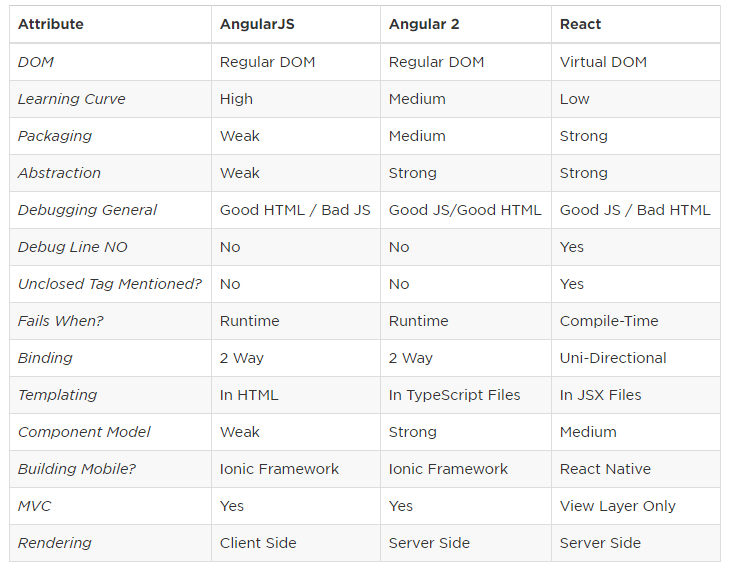
When selecting a JavaScript framework for the Enterprise, there are a number of factors you really need to consider. These include:

1)     Adoption – Does it have the backing of industry leaders? Who is behind it? Who is using it? How many production deployments are there? Is there community and developer support? Are there many jobs for it? Can I get the developers I need?

2)     Opinionated – does it provide you with a ready-made framework where most of the basic structural problems already have solutions, or do you need to put those solutions together yourself?

3)     Learning curve – How hard is it to learn and is it worth the effort to do so?

4)     Future proof – will this framework be around for a while? Is it using web standards and does it have a path towards future web standards? Is there a roadmap for supporting future web standards?

5)     Feature richness – Can I build awesome sites with it?

6)     Productivity – How easy is it to add features? How easy is it to maintain?

7)     Testable – is there a strategy for testing the application components?

8)     Size – does the framework contain a lot of large files? Is it slow to download? Is it heavy?

9)     Performance – does the framework introduce impediments to performance?

10)  Browser support – does the framework support many browsers including older versions?

11)  Licensing – are there any gotchas?

Adoption

There are only a few JavaScript frameworks that have made it really big. The two biggest are Angular and React. Angular is backed by Google, while React is backed by Facebook. Angular version 1 (AngularJS) was one of the most widespread technologies in use for an exceptionally long time. In fact, the earliest issue on the AngularJS wiki was raised in 2011 and its adoption was about 5 times bigger than React at the time it was deprecated. At the time of writing, Angular version 1 had 56,400 stars on GitHub. That’s a popular base.

But you wouldn’t start a new project in Angular version 1. There is virtually no one recommending people take that path. Bradley Dayley from Gartner certainly doesn’t recommend it, saying “Angular 2 is a much better option than Angular 1” and “Angular 2 is still one of the better frameworks out there”. Rob Eisenberg from Aurelia (and now Microsoft) doesn’t recommend it. Angular 1 has structural problems that cannot be discounted. If you’re on Angular 1, you really need to move forward. Jeremy Likeness, Director of Application Development at iVision made the comment “There will continue to be a long tail for Angular 1 apps, but there is a clear path to Angular 2 and I see people taking that path.”

Angular version 2 (now known as the singular “Angular” and currently at version 4) is a complete rewrite of Angular version 1. It was given the same significant support that Angular 1 was given. Google has backed it all the way, and, in fact, they have completely rewritten Google AdWords with it. That’s over a million lines of code. Angular 2 was started in 2015, and it now has 25,900 stars on GitHub.

React, on the other hand, has grown significantly. React is used by Facebook on Facebook. It currently has 71,033 stars on GitHub and has been around since 2013. Up until the Angular 1 rewrite was announced, it was making reasonable progress, but after the Angular 1 announcement, its popularity shot up as it was the main beneficiary of the doubts around Angular. People say you can’t compare the two, but that’s rubbish. The reality is that you can compare the two, because to use React you will pull in a Router, a Flux implementation, and various libraries. You will build a framework to provide the same functionality that you get from Angular. React probably has the strongest developer advocacy of any of the JavaScript frameworks.

Then, of course, there are other libraries. Backbone and Knockout are on the way out. Aurelia just hasn’t got the take-up, although it certainly has the support of its developers. Polymer is just meh at the moment. Meteor is a bit too rigid and doesn’t have the take-up.

Probably the biggest contender at the moment is VueJs. It’s new and the fastest growing of all the frameworks. It has 60,100 stars on GitHub already, and it’s only been around since 2015. It’s just like React, though, and will require you to put together a whole framework.

In terms of trends, in the last month, Angular 2 has grown by 1016 stars, React has grown by 2,495 stars, but Vue has grown by a staggering 3,546 stars!

For now, though, in the Enterprise, I’d probably say no to VueJs, but it’s certainly worth keeping an eye on and revisit in a year or so.

Because of these factors, in this article, I will focus on the two biggest players in the space, React and Angular.

Opinionated

Probably the biggest argument for and against the frameworks is whether or not they are opinionated. An opinionated framework is prescriptive; It is one where the majority of the structural/infrastructure decisions have been made for you. That is, it provides prebuilt boilerplate code that forces you to structure your code in a particular way. And because a lot of those decisions have been made for you, you can get on and focus on your own custom code, rather than having to work on building up the framework, spending a ridiculous amount of time building the infrastructure before you even get to write your first line of business-related custom application code. Sure, it might be a technically brilliant solution, but apart from some nerd points, who really cares?

Angular 2 is an opinionated framework. Out of the box, you have pretty much everything you need to build an Enterprise application. React, on the other hand, has so few strong opinions. To build something Enterprise ready requires a significant number of decisions. You need to build a foundation. These days, React provides a Router (it never used to) and you need to select one of the 20+ variations of Flux, but you should probably choose the most popular, being Redux. You’ll also need to select an interaction library to get you data from an external repository, something like Thunk. In fact, I would say that React, to me, requires a dog’s breakfast of technologies just to get a foundation up and running. And with putting together such a mix of new technologies, some will be more mature than others, and many are not actually supported by FaceBook.

So of course, it can be done, and many people are doing it. Between the time when Angular 1 was deprecated and Angular 2 was just getting off the ground, that’s what people were doing, as they didn’t really have another choice, and people were quite angry at what was happening to Angular.

If you’re going down the path of React, I would recommend going with all the most popular versions of the React tech stack. Here I recommend that you do a Pluralsight course and put together a framework based on what you learn from that, and build on that learning.

So, in the case of choosing a JavaScript Framework that has everything you need to build an Enterprise application, with all the modules supported, I would have to say Angular 2 wins hands down.

Learning curve

JavaScript frameworks are not the easiest to learn. Both Angular and React require a significant amount of time to get to an intermediate level, which would allow you to build an Enterprise application. I know there are people out there that claim it will take them a few minutes to get going with React and take far longer to learn Angular, but they’re not really talking about learning the full framework. With React, they are usually just talking about how quick they can learn how to use the view layer.

If you want to do something significant and Enterprise ready, my advice is to immerse yourself in a Pluralsight course. Make your entire team do it.

To give you an example of how long it takes to realistically learn Angular vs React, I suggest that you would need to do both a Beginner and an Intermediate course.

Doing John Papa’s Angular: First Look Beginner’s course takes 4.5 hours. Following up with Joe Eames Angular Fundamentals Intermediate course will take a further 10 hours. That’s a 14.5-hour investment.

Doing Cory House’s Building Applications with React and Flux Beginner’s course will take around 5 hours. Following up with Cory House’s Building Applications with React and Redux in ES6 Intermediate course will take a further 6.25 hrs. That’s 11.25 hours.

So, when people tell you React is easier to learn than Angular, my response to them is, not in the Enterprise it’s not! There’s not that much difference between 11.25 hours and 14.5 hours. If you are learning these frameworks from scratch, the investment in these courses is well worth it. You will get significant productivity benefits in doing this from day one. One gotcha here though – to learn a 10-hour course does not take 10 hours. It takes significantly longer to learn and absorb everything from one of those courses. When I started doing those courses, I found it could sometimes take me a whole day to get through one hour of course!

Future proof

We are now past the Angular 1 to 2 hiccup, and both Angular 2 and React will be around for a long time. Here, you need to ask how much each of these frameworks is oriented towards future web standards. In the case of Angular, it is closer to the web standard. React, on the other hand, diverges from web standards and patterns, and that is risky. That’s because they do their own virtual DOM code compilation, which is seen as a benefit in the case of React. Some people say that it would make it more difficult to move away from that towards a different framework that conforms better with the standard, but let’s be serious here, no one ever changes once they’ve decided on the framework until they are ready to completely rebuild the application, and an application’s lifetime is around 5 years, so it won’t be happening for some time.

Productivity

I have written apps in React and Angular and I have yet to form an opinion on this one. I rewrote an entire C# MVC web app in Angular 2 recently, it took me 2 weeks (just about killed me), but I was able to do it efficiently, and once the patterns were in place, it was pretty easy to cut and paste, and add features.

Also, I am actually more impressed with the separation of html from code, which Angular provides. Because of the way React works, the code and the html are all in one file. They say this is a good thing, but I believe that keeping the UI as separate as possible from the code is better, especially if you have designers on the team, who might want to modify the layout of the html while you are still coding the component.

React does win in one area here – catching more errors at compile time. Because the code and html is represented in the one file, it can detect errors in your html at compile time. Errors found earlier in the development process are cheaper to fix.

Angular also loses some marks here because of it’s ridiculously quirky attributes. Check out some of its ridiculously confusing syntax: *ngFor, [(ngModel)], [model], {{model}}, (click), [hidden], *ngIf, [class.selected]. With a decision process that thought they were acceptable, you certainly understand why Rob Eisenberg ran a mile from those guys and wrote Aurelia!

Feature richness

Both Angular and React are feature rich and there is support for a massive number of add-ons for both environments.

Size

I found it exceptionally hard to verify the claims that React is significantly smaller than Angular. Anton Vynogradenko produced a site that showed some stats obtained from a CDN for various JavaScript framework configurations. They showed that Angular 2 minimised would take 566K out of the box, whereas React with React DOM, Redux and React Router is around 191K. That’s a significant difference, and React would win hands down.

Here’s a link to Anton’s page: https://gist.github.com/Restuta/cda69e50a853aa64912d

The issue with size comes back to how long it takes to transfer the file, and for a large site with significant traffic, it would probably affect data cost as well.

Unfortunately, the stats haven’t been kept up to date, and there is no CDN provided for Angular 2 version 4. Given that Angular 4 was an optimisation release, it would surprise me considerably if the difference was still that great. Without further investigation, I can only form the opinion that React is probably about 1/3rd of the file size. In a corporate environment, it probably wouldn’t matter much, as you’d just wait the extra second for the page to load, put on a significant public site you might want to investigate this more thoroughly.

Edit: I have since learnt about Tree Shaking and Ahead of Time compilation (AOT) in Angular. In tree shaking, webpack strips out any code or files that are not actually being used in your application. If you have a look at the humongous node_modules folder, it could contain hundreds of megabytes of code and content. There’s no way all those files would be delivered to the browser, it just isn’t viable. Tree shaking reduces the code base significantly. Secondly, AOT is used when delivering your production bundle. It precompiles all the code and because of this, it does not need to actually deliver the Angular compiler files to the browser. Compilation happens pre-delivery.

Performance

It’s hard to judge performance when all you’ve got to go on is other people’s potentially biased and vested opinions. I don’t need to give you too much of my own opinion here, other than to suggest that you take a look at Stefan Krause’s JavaScript Framework Benchmark site. This site contains a whole lot of benchmark tests for a wide array of JavaScript Frameworks, and he provides a calculated score (slowdown geometric mean) for framework speed. The benchmark was up to Round 6 at time of writing.

According to that site, Angular 2 (version 4) gets a speed score of 1.31 at its most efficient, and React with Redux gets a score of 1.41 at its most efficient. Certainly not enough to make a decision one way or the other.

In terms of memory performance, Angular 2 (version 4) and React (with Redux) are also very close. After adding 1000 rows, Angular 2 (v4) uses around 10.88 MB, while React with Redux uses 10.76 MB

Stefan’s site is here: http://www.stefankrause.net/js-frameworks-benchmark6/webdriver-ts/table.html

Browser support

Both Angular 2 and React take advantage of polyfills. Polyfills are JavaScript libraries that provide backward compatibility with older browsers. But seriously, any organisation that is still on IE9 really should have its head checked. Either way, transpilers these days are exceptional and you should be able to find a solution to produce what you need for either Angular or React.

Maintainability

I don’t really see much difference in the time taken to maintain React or Angular 2. Both environments are similarly componentised, so shouldn’t be a problem to maintain.

Testable

Both Angular 2 and React have a similar testing setup. I don’t see much difference here.

Licensing

Angular 2 is released under the MIT licence. You can use it pretty much however you like. You can modify it. You can on-sell it.

React is released under a modified BSD licence. The “FaceBook” licence. There is an odd clause in the FaceBook licence. Basically, there’s a non-compete clause in there. I don’t want to interpret it for you, but you should take a look yourself if you think you might have an issue. Here is the text:

“The license granted hereunder will terminate, automatically and without notice, if you (or any of your subsidiaries, corporate affiliates or agents) initiate directly or indirectly, or take a direct financial interest in, any Patent Assertion: (i) against Facebook or any of its subsidiaries or corporate affiliates, (ii) against any party if such Patent Assertion arises in whole or in part from any software, technology, product or service of Facebook or any of its subsidiaries or corporate affiliates, or (iii) against any party relating to the Software.”

Hiring people

When hiring people, you want them to be able to hit the ground running. If you are using Angular 2, and you hire a trained Angular 2 person, you would expect that they would already know the complete tech stack, and anything else is a bonus. When hiring React people, its a lot more complicated because there’s no consistent framework and so even if you hire a trained React person, there’s no guarantee that they will know the various libraries that were chosen in your environment.

Hot module replacement

Both React and Angular enable Hot Module Replacement. What this means is that you can be coding in your IDE, and the moment you hit save, behind the scenes it will detect that the code has changed, recompile it, and update the browser. In most cases, you won’t need to actually restart your browser, it does an in-place replacement. Out of the box, if you change something in an Angular application, the code is changed and the browser is updated, but it resets the state. Say you have a counter label on a page with an increment button. You click the button and the counter increases, 0, 1, 2, 3. Then you change the code on that page to double the increment each time, and hit save. The page will be updated and the counter will be reset back to zero. That’s how it works in Angular. Under React with Redux, the counter does not actually get reset, it just continues on where you left off! But Angular people need not despair; you can add Redux to your applications and achieve the same thing, just not out of the box. (Note, I haven’t actually achieved this myself but intend to soon.)

Conclusion

There are a whole lot of reasons why you might choose one of these frameworks over the other, and I hope I have provided you with a few more issues to consider. If your application is small, or you want a more traditional application with only a JavaScript-based view, you might straight away choose React, or even Vue. In small applications, it probably doesn’t really matter.

If you’re building a large application and you have a highly sophisticated team that enjoys investigating and evaluating new technologies, are happy to make the specialised decisions and put in the hard work required to build a foundation, and you’re not worried about the patent clause, then by all means, go with React. But if you’re writing a large application and you need the enforced structure out of the box, I would recommend that you go with Angular.


The failure of npm for Visual Studio in the Enterprise

January 15, 2017

Modern application development is hard. There are simply so many things you have to think about when you are developing, and over time, more and more features are created and many of those need to be integrated into your applications.

This is not without cost. Early on in my career, we used to talk about DLL Hell. DLL Hell is the problem where there were so many versions of a DLL installed in your environment that you never knew which one that application was trying to use.

The modern version of this I now call Package Hell. When I open a modern enterprise Visual Studio application, such as an Angular 2 application, I now have a minimum of around 40 packages installed under the Dependencies/npm branch, just to get a simple application up and running, and many of those packages have dependencies too. And that’s only one of the package managers. Other package managers available include nuget, and Bower.

What is supposed to happen these days is that anything that is Microsoft Dot Net related may be found in nuget, while anything that is javascript related will be in npm. Npm is the node package manager. It is essentially an online repository for javascript packages, not just in the Microsoft world, but for any environment that wants access to those packages over the web. It enables developers to find, share, and reuse packages of code from hundreds of thousands of developers — and assemble them in powerful new ways. Microsoft didn’t invent npm. Microsoft decided it was the tool everyone was using, that did the job, so decided to get onboard. They decided they needed to do this to keep up, to stay competitive in the development space.

To easily explain the problems with npm, I will compare this to nuget. Why? Because nuget works! Nuget Package Manager is simple, it is visual, it keeps you informed, it’s easy to find packages and keep them up to date, and it’s easy to change versions of packages if you need to. You don’t need to focus on the tooling – you can install packages and focus instead on integrating with your business logic and providing business value.

npm Problem 1: The proxy.

If you want npm to work in an enterprise environment, you will most likely have to go through a proxy server.

With nuget, you open up the package manager screen, type in package names, and it gives you a list of candidate packages. It automatically handles the proxy for you. You don’t have to configure it to work. You don’t have to go to everyone’s machine, modify a configuration file, just to ensure that their login has the credentials to authenticate through the proxy to get to the nuget repository. It is automatic.

npm, in this regard, is a complete failure. In the environment I was in, we couldn’t even get that configuration right – even with all the correct settings, it still failed. The workaround is to install a third party package called cntlm, which is a service that opens a local port and automatically authenticates through the proxy. All you then have to do is point npm at that port. “Install what?” I hear you say. Yep, exactly. That’s a major fail in a large environment.

Note: you could also use fiddler, but its the same issue. Developers shouldn’t have to spend time configuring or using third party packages for something that should just work out of the box. It works for nuget. It needs to work for npm

npm Problem 2: Finding new packages.

When using nuget, you type a keyword into the search bar, and you can see a list of packages come up. Most of the time, this is because you were googling and found a reference to a package that might solve a problem, or you might have come across some cool new feature and want to try it out. In the process of doing that, you might also discover other packages that do the job, because you can easily scroll down the list and see what else is on offer. Nuget makes discovery of new interesting packages easy.

But not with npm. Sure, you might find out about the package by googling, but the exploration in npm just isn’t there. In npm, it involves opening up the package.json file, typing a double quote and then you will get your list of choices in a 9 item scrollable tool tip. It’s rubbish. Not to mention that some packages aren’t even discoverable. That’s right, you can’t actually find any package in the registry that starts with an “@” symbol, such as @angular because there are special rules for scoped packages.

npm Problem 3: Version control.

With nuget, when you open up the package manager, it looks up the list of installed packages and compares their version number with what’s available on the net. If one of the packages has been upgraded, it shows you in an Updates tab. You can then choose to upgrade if you want. It’s entirely up to you. But at least it has that feature.

With npm, on the other hand, you might have 40+ packages, but there’s nowhere near as much control. Compared to nuget, it really sucks. To tell nuget that you want to continually upgrade, you have to manage it in a configuration file, for example:

“jquery”: “^2.2.1”,

The hat ^ character tells it that you are happy for it to install any version it finds above this. Um. Wrong. You should be the one to decide when you want upgrades. Part of the problem is finding out when something needs to be upgraded, and npm fails at that. The second problem is that not every upgrade is a success. In a corporate environment, you don’t upgrade a major package automatically because it will break stuff and then your whole application is unusable. But you still want the option. You still want to know if there is a package upgrade available, so the npm way is to only install a particular version. Never mind that you would have at least liked the option to upgrade. The whole concept is flawed.

npm Problem 4: Configuration files and the command line

Ok, so we somehow have reverted back to using the command line or fiddling with configuration files. It’s all very 1990s. I mean seriously, who has the massive enough ego to require people to fiddle with json configuration files? Is there some hugely nerdy boffin who still believes they are better than everyone else because they can memorise a bunch of command line attributes?

This is the 21st century. I want my people focusing on business logic and producing business value, not working out the correct command they need to type to get some package installed on their machine. Not when a visual tool will provide everything they need to continue with their core function, which is to provide business value.

Those are the 4 major failures, but now for a couple of quirks.

npm The Quirks

Firstly, when I do an npm restore packages, its often quite difficult to figure out what’s going on or whether its finished its work. The user interface is still interactive too, and you can right-click and install individual npm packages and click restore, even though a global restore is in progress. Huh?

Secondly, my Dependencies folder is almost permanently set to “Dependencies – not installed” even though all my packages are installed. What is the point of showing this if the message isn’t helpful. It makes people lose confidence in the tooling.

In our environment, like most corporate environments, introducing new technologies can be quite difficult. It’s a typical catch-22 situation. You can’t introduce a new technology until its proven, but on the other hand, you can’t prove it until you’re allowed to introduce it. It’s why so many corporates bypass the architecture teams and build a silo to enable innovation within an environment to gain a competitive advantage. It becomes even harder when the tools are problematic.

I was able to get an application up and running within the corporate environment. It was an Angular 2 application running on Dot Net Core with Web Pack. Because of my skill level, I could get it going, but to expect others with less experience to have to fight configuration files and do stuff from the command line and configure the proxy, and install third party tools just to be able to start their job is ridiculous. It’s all experience, I hear you say, well, no. I don’t buy it. It’s hard enough to move to new technologies without the added complexity of dealing with problems that should not exist.

The result was that after a week of having the team fighting (mostly) npm and all the new technologies, we decided to fail early. The entire rest of the team were continually struggling with the development infrastructure and it became a productivity killer. So we have gone back to our old and working development environment. The down side is that there a certain packages that aren’t available on nuget, such as Angular 2. But the up side is that everything else works.

I have to say, I’m disappointed. For all its supposed benefits, the new environment just felt half-baked. The impediment to getting a team running smoothly was just too high. For this to work, npm needs a user interface, and it needs to work automatically through the proxy, much like the far superior experience of nuget. This needs to be fixed for us to be able to move forward, or they will be just as happy, where I am, to stay on the existing tech stack that runs smoothly and virtually without a hitch.

Edit: I have since found out that there is, indeed, a GUI for npm package management. The problem is that it is only available in Node Js applications and not standard asp.net applications. What’s also disappointing is that the GUI isn’t really very good. It certainly isn’t up to the standard of nuget – it feels very much a hack.


GitFlow Cheat Sheet

September 8, 2016

Installing GitFlow on Windows

  1. Install cmder. Google it. Make sure you get the git for windows version.
  2. Download and install in C:\Program Files\Git\bin

a) getopt.exe from util-linux-ng package from the Binaries zip folder found at http://gnuwin32.sourceforge.net/packages/util-linux-ng.htm

b) libintl3.dll from libintl package from the Binaries zip folder found at http://gnuwin32.sourceforge.net/packages/libintl.htm

c) libiconv2.dll from libiconv2 package from the Binaries zip folder found at http://gnuwin32.sourceforge.net/packages/libiconv.htm

  1. Start cmder, which is a better command prompt console. Change folder to the one that you want to install gitflow in. It will install a gitflow folder under this.
cd c:\users\Tony

4. Clone the gitflow repository.

git clone –recursive git://github.com/nvie/gitflow.git 

5. Change to the gitflow folder

cd gitflow
  1. Install gitflow, using the following command:
Contrib\msysgit-install.cmd “c:\Program Files\Git\”


Installing GitFlow in a repository

  1. Create your project folder: mkdir c:\demos\flow
  2. Change directory to the project folder: cd c:\demos\flow
  3. Initialise an empty Git repository: git init
  4. Initialise the repository for GitFlow: git flow init

Choose all the defaults.

The prompt should change show that you are in the c:\demos\flow (develop) branch.

  1. Checkout the master branch
git checkout master
  1. Make sure you have set up a repository on GitHub. On the github repository page, click on the Clone or download button and then click on the Use SSH link in the top right hand corner. Copy the link. Then execute the git remote command to set up the origin in git:
git remote add origin git@github.com:tonywr71/PSGitFlow.git
  1. Now push the origin to the master, to establish the github connection
git push –u origin master
  1. Change back to the develop branch
git checkout develop
  1. Now push the develop branch
git push origin develop
  1. If you go back to the repository page, you should now be able to select the two branches from the Branch drop down.


Creating a Feature Branch

  1. Make sure you have cloned the repository into a destination directory
git clone git@github.com:tonywr71/PSGitFlow.git .

Note the period (.) which is used to force it to be installed in the current directory, not a child of the current directory.

It will put you in the (master) branch

  1. Change to the develop branch
git checkout develop
  1. Initialise gitflow in the new folder if it hasn’t been done already
git flow init

and select all the defaults

  1. Go into github for this repository and select the Issue tab. We want the new feature to be associated with the issue. So add a new issue for the feature. The Issue number and issue subject should be part of the new feature name. The Issue Subject here would be “Users Can Access Single Entries” for example.
  2. Add a new feature branch
git flow feature start 2-UsersCanAccessSingleEntries

where 2 is the Issue number and UsersCanAccessSingleEntries is a concatenation of the issue subject. The command prompt will now show the feature branch:

c:\demos\tony (feature/2-UsersCanAccessSingleEntries)

  1. This branch hasn’t been pushed back into the repository yet, so there is no tracking in github. If you make changes to code in this folder, the prompt will now be highlighted in red, to show changes pending. If you want to see the pending changes, execute:
git status
  1. To add the files into git
git add .
  1. To commit the repository locally, with a message:
git commit –am “Added code to get single entry”

This will change the command prompt folder back to white and commit the changes locally.

  1. To add the feature back onto the central repository
git flow feature publish 2-UsersCanAccessSingleEntries
  1. If you go into github, you can now select the feature branch from the Branch drop down


Reviewing a feature branch on another machine (or in another folder on the same machine)

  1. To see the list of feature sub-commands in gitflow:
git flow feature help
  1. To pull the feature into my local repository, switch you into that branch, but don’t track changes:
git flow feature pull 2-UsersCanAccessSingleEntries
  1. To pull the feature into my local repository, switch you into that branch and track changes to that feature:
git flow feature track 2-UsersCanAccessSingleEntries
  1. Make your changes in the tracked folder. In Cmder the command prompt will show a red feature folder. Again, you can see the pending changes by executing:
git status
  1. Add the files that have been changed:
git add .
  1. Then commit them to the local repository with message:
git commit –am “Added exception handling”
  1. Finally, to push them to the central repository:
git push


Get the reviewers changes back on the originator’s machine

  1. Check out the feature and pull it.
git pull


Finishing the Feature Branch and merging back into the develop branch

  1. The developer closes the branch, not the reviewer. The developer would click the Merge pull request button to merge back with the develop branch. The reviewer Closes the pull request, but doesn’t finish it. To finish the feature, the developer executes:
git flow finish 2-UsersCanAccessSingleEntries
  1. The feature branch is now deleted both locally and remotely, and you will have been switched back to the develop branch.
  2. Other developers that are using this feature will also need to delete their local branch. That is done by executing:
git checkout develop
git branch –d 2-UsersCanAccessSingleEntries
  1. To check it has been removed
git branch

should no longer be showing the feature branch.


Creating a Release Branch

  1. This is the point in time where a release is ready.
  2. Once the Release Branch is created, it is passed to QA for testing.
  3. Any bugs that are found on the release branch will need to be fixed on the Release Branch and then merged back into the develop branch, so that any future feature branches will pick up those fixes.
  4. The architect creates the Release Branch by executing:
git flow release start sprint1-release
  1. The command prompt will show the new release folder, but this branch is currently only on the local machine. To publish this release so everyone can access it:
git flow release publish sprint1-release
  1. If you go into github and pull down the Branch drop down, you will see the new Release Branch.


Reviewing a Release Branch

  1. To view and track the release on someone else’s machine, set up a folder on that machine and execute:
git flow release track sprint1-release
  1. If someone makes changes to files in that branch, you can check the changes using
git status
  1. You can then add any changes to the local repository
git add .
  1. Then commit the changes to the local repository
git commit –am “Add logging to exception (example message)”
  1. Then push the change to the remote repository
git push
  1. The changes are now in the Release Branch, but need to be merged back to the develop branch.
git checkout develop
  1. Pull the develop branch
git pull
  1. Then merge it with the release branch
git merge release/sprint1-release
  1. That merge is local, so we now need to push changes back to the develop branch
git push 


Cleaning up the Release Branch and pushing to the master branch

  1. This job is done by the Architect, who will change to the Release Branch
git checkout release/sprint1-release
  1. Do a pull to make sure the local machine is up-to-date
git pull
  1. Now finish the release
git flow release finish sprint1-release

This will merge our flow back into the master branch and open up an emacs text editor to allow us to enter a more substantial release note. Save the text editor and exit. The release will be merged into the master branch and tagged with the release name. The tag is also back-merged into the develop branch. The release branch is also deleted both locally and remotely, and you are switched back to the develop branch.

  1. At this time, the develop branch is still checked out, so we need to change back to the master branch to check it all in.
git checkout master

When executing this command it will tell you how many commits there are difference between the master and the develop branch.

  1. We need to push all these changes including all the tags back to the remote repository.
git push –-tags


Creating a HotFix

  1. A Hot Fix is an emergency fix to released code. The Hot Fix is created on the master (production) branch. After making the fix on the Hot Fix Branch, it is then merged back into the master and develop branches.
  2. On the machine where the fix needs to occur, start the hotfix
git flow hotfix start hotfix1

Note that hotfix1 should match an issue in GitHub

  1. You will now be in the hotfix branch. Make changes to this branch and you can see the changes to the branch by typing
git status
  1. Once the hotfix has been finished, the changes need to be committed:
git commit –am “Hot fix changes”
  1. The developer can then finish the hotfix by executing
git flow hotfix finish hotfix1

This will bring up the emacs text editor and you can add a hotfix release note, then save and close the editor and it will merge the hotfix into the master, tag it as hotfix1, back merge that tag into the develop branch, deleted the local hotfix1, and switch you into the develop branch.

  1. To see how many commits are outstanding on the develop branch, type
git status
  1. You can also switch to the master branch and see where that is
git checkout master
git status
  1. To push changes back to both remote branches, execute:
git push –-all origin

What are Microservices?

August 14, 2016

Microservices sounds like a pretty slick name, but in fact, it isn’t all that complicated. Microservices are, broadly speaking, all about providing APIs and collaborating between those APIs.

Microservices are a specialisation, a refinement and an evolution of Service-Oriented Architecture (SOA). It is a specific approach for how to do Service-Oriented Architecture better. It has arisen, not due to any academic theories, but from an analysis of lots of real world projects, and takes all the best approaches of SOA learnt from that experience.

The reason you don’t hear much about Service-Oriented Architecture any more is that it was actually a big embarrassing failure. For all its promises, very little actually materialised. There was a lack of consensus on how to do SOA well, there was a lack of guidance on service granularity, SOA doesn’t talk about how to ensure services don’t become overly coupled, and there were too many attempts by vendors to lock you in.

Microservices provides architectural guidance to ensure better choices are made when divvying up an application for better maintenance, flexibility, scaling, resilience and reuse. The idea is to break up large all-encompassing monolithic applications into a whole lot of little services. The smaller the services are, the more the benefits around interdependence are maximised. It also allows functionality to be consumed in different ways for different purposes. The downside is that extra complexity emerges from having more and more moving parts, so we have to become a lot better at handling those complexities.

Microservices aligns well with existing software development methodology, technologies and processes. By splitting an application into a bunch of services, and forcing them to communicate with each only via network calls, it allows each service to be treated like its own bounded context, a concept from Domain Driven Design. Each service also needs to have a Single Responsibility, to be a completely separate entity, to be able to change independently of each other, and to be deployed by themselves, without requiring their consumers to change.

By managing a bunch of separate services, each component can be scaled separately. Too much demand for one service? Spin up another process of that service. They can also be run on multiple separate machines. The system is also much more resilient, as the failure of a single service does not bring the entire system down.

And you are not constrained by the technologies that they run under either. Because there are lots of little services, they work well in the cloud, where the architectural approach can be so closely correlated to an almost immediate cost saving as you reduce compute time for elements that don’t require much resources and increase compute time for the bottlenecks in the application.

Large organisations may have a large number of microservices, and because each microservice is entirely independent, they can be coded in isolation as well. The Microservice approach allows us to divvy up the services so that we can hit the sweet spot between team size and productivity. A good starting point for how big a microservice should be is around 2 weeks of work for team of around 8, so that fits really well in with Agile sprint size as well. You can also have the entire team for a single microservice collocated, while another team may be working on a complementary microservice collocated elsewhere.

There are also other benefits from using the microservice approach to application construction. Teams that follow that approach are actually quite comfortable with completely rewriting services when required, and choosing alternative technologies with the ability to make more choices on how to solve problems. They also have no problem replacing services that they no longer need. When the code base is only a few hundred lines of code, it becomes difficult to become emotionally attached to it, and the cost of replacing it is pretty small.


Angular 1 is dead. Where to now?

August 7, 2016

Angular 1 has a massive market. It is by far the most widely used JavaScript framework available. It is a very opinionated framework, it has declarative power, and developers tend to lean towards the MV* patterns which has a whole lot of benefits and with which they are familiar with. So Angular itself is not going away any time soon.

The biggest problem with Angular 1 is that it is no longer being actively maintained. The main reasons for this are Componentisation, Performance and an inability to play well with search engines (SEO), which, incidently, are the main factors that have made its main competitor, React, so popular. There is also quite a significant learning curve with Angular.

Componentisation enables you to build custom component trees quite easily, and the resulting code is usually much more maintainable. Performance was always a killer in Angular 1 due to watches and the digest cycle, which was basically a system for monitoring every single changing item on your page.

There was a limit of 2000 watches, and as soon as you went over that, IE pages simply ground to a halt. Finally, having a whole lot of script on the page did not make Search Engine Optimisation easy at all. Search engines don’t know what to look at with a single page application. They find it hard to walk the tree of links between your pages, because they aren’t seeing what you are seeing, they need to interpret the script behind the scenes that is being executed.

So the Angular team announced a complete rewrite of Angular 1, because they found that the structural problems with Angular 1 could not be resolved via a simple upgrade. They gave their own existing product a resounding fail. In doing so, they signed its death warrant.

What do you select then, if you have a whole lot of experience in Angular 1, and need to choose a JavaScript framework for your next project?

Well, after analysing the market, reading a whole stack of analysis and reviews, having a play around with the technologies, I can say that there’s not a lot in it. Because Angular 2 is so different to Angular 1, you don’t need to automatically choose Angular 2 going forward. That said, because of the strength and size of the Angular 1 market, I don’t see Angular 2 going away any time soon.It may be an easier sell to management, especially how much was previously invested in Angular 1 training, to go to Angular 2.

Steve Sanderson, from Microsoft, produced the following table, showing the benefits of the few of the frameworks. I really thing the server side pre-rendering is important, especially when one of the major complaints with Angular 1 was the lack of deep-linking and SEO support.

Angular 2 Knockout React React + Redux
Language TypeScript TypeScript TypeScript TypeScript
Build/loader [1] Webpack Webpack Webpack Webpack
Client-side navigation Yes Yes Yes Yes
Dev middleware [2] Yes Yes Yes Yes
Hot module replacement [3] Yes, limited Yes, limited Yes, awesome Yes, awesome
Server-side prerendering [4] Yes No No Yes
Lazy-loading [5] No Yes No No
Efficient prod builds [6] Yes Yes Yes Yes

There is one framework not shown here that has gained some traction in recent times and that is Aurelia, which has recently been released (RTM). Aurelia was created by the developer who produced Durandal. He later joined the Angular 2 team, had some input into that, but later left that team because he disagreed with some of their decisions. And some of those decisions are probably valid, while others may not have been, such are the egos of developers. Aurelia is supposed to have a more simplified syntax to Angular but doesn’t currently have the market penetration.

I like to keep things simple. I like to look at what has solid traction, and try to limit my choices based on what the technical capabilities are, maintainability, performance, ease of learning it and popularity. This tells me that the two frameworks with the most promise are actually Angular 2 and React+Redux.

Although Angular 2 has only reached RC4, I still consider it a viable choice today, as, remember, by the time  your app is released it will most likely have gone to RTM. There are actually a number of significant applications that have been built in Angular2 release candidate. The strong tooling and support when Angular 2 is finally released is also a consideration, as whatever your choice is, you really will want longevity of your code base, and you certainly don’t want to be embarrassed by making a fringe choice that has potential that never materialises.

Alternatively, you might choose to go with React+Redux, which is also available with Visual Core 1.0 and Visual Studio 2015. React is supported by Facebook, and is part of a more advanced ecosystem. Facebook are also innovating faster to answer any architectural issues related to component-based frameworks. Each framework tries to steal the best bits from each other, and both React and Angular have been doing this.

If it was pure performance I was after, I think I would have to go with React. React is not an Angular killer, however, mainly because of the size of the Angular base and the structure it provides.  React is probably a lot simpler to learn, while Angular 2 has become better at this. It really comes down to how structured you need your code to be versus how much performance you need to get out of your web servers. With massive cloud based sites, extra web servers and lower serving capacity costs money, so I’d say they’d probably be better with React.


Edit: I just found another table that is worth linking to, by Shannon Duncan. It has more attributes compared, which make it much more interesting:

angular2-vs-react

That article may be found here: Angular2 vs React


Installing Angular 2 to run with Visual Core 1.0 in Visual Studio 2015

August 7, 2016

I initially had a lot of trouble even finding references to people using Angular 2 in Visual Studio 2015. It seems that no matter what I fiddled with, there were failures at every turn. It ended up being quite tricky to get it working. In the end I found that the best way to get going in Visual Studio 2015 was to use yeoman to create your base. And then work backwards to figure out where I went wrong.

Yeoman is yet another package manager. Basically, smart people put together packages with technologies that they think are right together, and submit the packages to yeoman. You go to yeoman.io and you can look up the packages that others have put together.

I initially tried via the yeoman web site, clicked on Discovering Generators, then searched for Angular2, and found the aspnetcore-angular2 package. It was ok, but I had trouble getting it working with ES5.

I recently went to NDC Sydney, and saw a session by Steve Sanderson. He has put together a great yeoman package that works with Visual Core 1.0 in Visual Studio 2015. The package is called generator-aspnetcore-spa, and installation details are available from his web site: Steve Sanderson’s blog. It has been updated to RC4, and the TypeScript target is set to es5, so it will run on most popular modern browsers.

The beauty of Steve Sanderson’s package is that it also supports React as well, in case you want to give that a try.


ASP.NET Core 1.0 – How to install gulp

July 31, 2016

In a previous blog post, I installed npm, otherwise known as the node package manager. I added an npm configuration file under the wwwroot folder called package.json. There are two problems with this. Firstly, Visual Studio Dependencies haven’t been designed for that scenario, which means adding npm packages won’t update the Dependencies folder at the root level, so you lose a fair bit of control over the packages installed. Secondly, the nature of npm is that there could be a whole bunch of additional files added to the package that could be unrelated to the runtime needs of the package. Having these files added could potentially create a risk.

Now, to approach a better practice, I have decided to go back to putting the packages in the root folder. I right-clicked on the project, add new item, and then selected an npm configuration file, then add. This adds the package.json back into the root folder. I then copied the contents of the original package.json I had under wwwroot into the package.json file in the root folder. After this, I deleted the package.json file from the wwwroot folder and deleted the entire node_modules folder. Why did I do this? Because that is what the state of the folder would have been like under the default scenario of installing npm packages at the top level.

Now, given that any static files that are served to the web site need to reside under wwwroot, I had to come up with a way to relocate the contents of node_modules under wwwroot that didn’t involve putting the package.json file there.

While the most common way to do this was simply to add a static file provider to the Startup.cs file, in the configure method, as the following code demonstrates

 app.UseStaticFiles(new StaticFileOptions
      {
           FileProvider = new PhysicalFileProvider(Path.Combine(env.ContentRootPath, "node_modules")),
           RequestPath = "/node_modules"
      });

I decided that eventually I will want a lot more control over this.

Well, the way of the future is to use a tool like gulp, which enables you to run tasks via the Task Runner Explorer in Visual Studio 2015.

Now, I have to admit that I have been attempting to get Angular 2 running in Visual Studio Core 1.0, with some success. That will be the subject of a future post. But for now, I have added gulp into the npm package.json file. That now likes like this:

{
  "version": "1.0.0",
  "name": "myfirstaspnetcoreapp",
  "private": true,
  "devDependencies": {},
  "dependencies": {
    "@angular/common": "2.0.0-rc.4",
    "@angular/compiler": "2.0.0-rc.4",
    "@angular/core": "2.0.0-rc.4",
    "@angular/http": "2.0.0-rc.4",
    "@angular/platform-browser": "2.0.0-rc.4",
    "@angular/platform-browser-dynamic": "2.0.0-rc.4",
    "@angular/router": "3.0.0-beta.2",
    "bootstrap": "^3.3.7",
    "core-js": "^2.4.0",
    "reflect-metadata": "^0.1.3",
    "rxjs": "5.0.0-beta.6",
    "systemjs": "0.19.27",
    "zone.js": "^0.6.12",
    "gulp": "^3.9.1",
    "rimraf": "^2.5.4"
  }
}

At the bottom of this file are references to gulp and rimraf. Rimraf is the package for doing the unix equivalent of an rm -rf. Gulp is needed to support gulp in the Task Runner Explorer.

Next I added the gulp configuration file to the top level of my project. Right click on MyFirstAspNetCoreApp and click Add New Item, then select Gulp Configuration File. The Gulp Configuration File is a javascript file called gulpfile.js. Keep that name and click Add.

Open up gulpfile.js, and paste in the following code:

var gulp = require("gulp"),
    rimraf = require("rimraf");

var paths = {
  webroot: "./wwwroot/",
  node_modules: "./node_modules/"
};

paths.libDest = paths.webroot + "node_modules/";

gulp.task("clean:node_modules", function (cb) {
  rimraf(paths.libDest, cb);
});

gulp.task("copy:node_modules", ["clean:node_modules"], function () {

  var node_modules = gulp.src(paths.node_modules + "/**")
                    .pipe(gulp.dest(paths.libDest + ""));

  return node_modules;
});

What this code does is copy the entire nested contents of node_modules in the root folder to node_modules under wwwroot. Now, I wouldn’t ordinarily finish here, as you really should be more specific about the content you’re actually copying. But to keep it simple, I have settled on this for now.

Next, open up the Task Runner Explorer. If you can’t see it at the bottom of your screen, it is found under View > Other Windows > Task Runner Explorer.

After building my app, the task runner explorer looks like this for me.

asp-net-core-task-runner-explorer

Now I can right-click on the copy:node_modules task and click Run. If you notice in gulpfile.js, there is a dependency on clean:node_modules, so that will run clean as well. You shouldn’t need to run this every time you compile the application. You only need to run this when adding and removing npm packages. Nothing changes in the meanwhile.

Now, when you you go to wwwroot and Show All Files, you should see the node_modules folder has been copied.

The files within node_modules are now available to be added into your html.


Why you should (almost) always choose an off-the-shelf grid and not build your own.

July 30, 2016

Recently I was in a situation with a whole lot of people who I think should know better. We were building an application and I was not there when the questionable decision was made to build their own grid.

There are a whole swag of reasons, except in the simplest of cases, why you should never build your own grid. Grids can be complicated, and they can require a significant investment to obtain even the simplest of features that you would otherwise get in an off-the-shelf product.

Features like sorting, filtering, frozen columns, frozen rows, summing, hierarchies, cell editing, data exporting, pagination etc. For high volume data, they also include virtual paging, which loads data into the grid page by page, instead of all at once. They can be styled however you want them, and they are fully tested. Sure, they can require a little bit of learning to achieve what you need, but the cost of doing this is significantly less than the build your own solution. The only time you run into problems is when there is too much bloat, or you are trying to do too much with the grid, a problem you would probably have regardless of which path you took.

But you don’t need to believe my opinion. It is a principle of Domain Driven Design. Eric Evans, the original author of Domain Driven Design has a Domain Driven Design Navigation Map which clearly states “Avoid over-investing in generic sub-domains.”

A grid is a perfect example of a generic sub-domain. From Eric’s Diagram:

domain driven design navigation map - generic subdomain

So next time someone is absolutely adamant that they need to build their own grid, see through that for what it is, especially if they claim to be Domain Driven Design experts.